
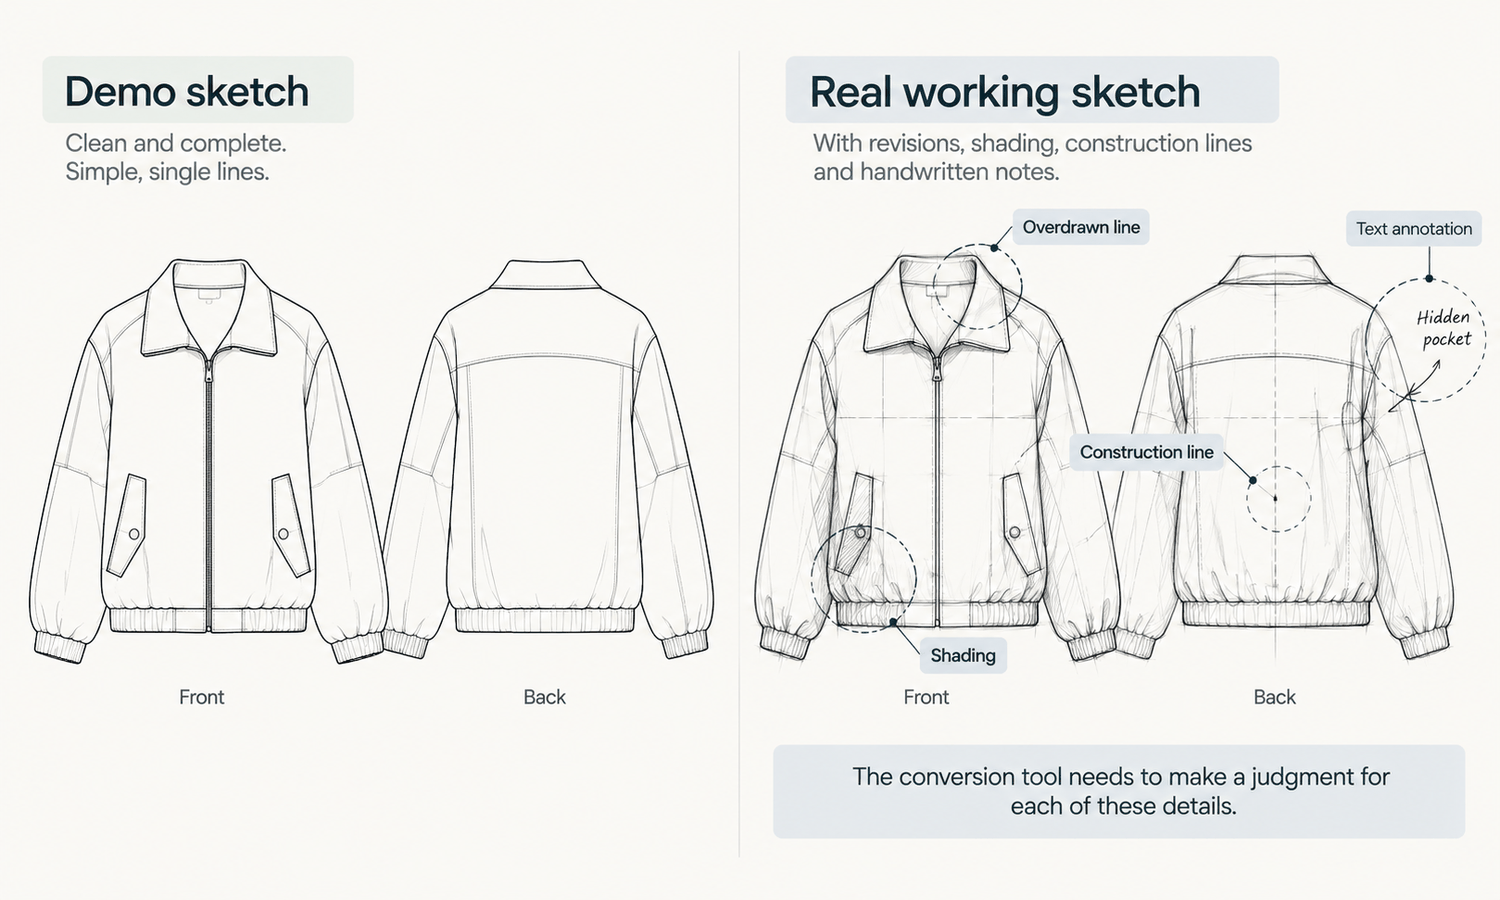
Every sketch to photo converter looks impressive on its own examples. A clean line drawing goes in, a realistic garment comes out, and the result is convincing enough to use in a presentation. The trouble is that those examples are chosen to show the converter at its most comfortable: tidy lines, complete outlines, simple garments and nothing ambiguous on the page.
Your team's sketches are not like that. They are drawn quickly, often with construction lines left in, notes written beside them, several views on one page and details that only make sense to the person who drew them. How a converter handles those sketches is what decides whether it is useful to your team, and the only way to find out is to test it on them.
This article explains why demo sketches mislead, how to build a test set from your own sketches, what to check in the output, how to record results you can trust and how to run the test in practice. It does not compare converters. It gives you a way to judge any of them on your own work.
| Test | What to look for | Why demo sketches hide it |
|---|---|---|
| Line fidelity | Seams, darts and panels kept where drawn | Demo lines are clean and unambiguous |
| Ambiguous lines | Folds, shading and construction lines interpreted correctly | Demo sketches contain none |
| Notes and labels | Written notes ignored, not drawn as garment details | Demo sketches carry no text |
| Filled-in materials | Fabric, color and trims plausible and controllable | Demo results are chosen for appeal |
| Repeatability | Similar results when the same sketch is run again | Demos show one result, not several |
| Response to references | Fabric and color references actually followed | Demos rarely show inputs beyond the sketch |
Why Demo Sketches Mislead
A converter works from the lines it is given. The cleaner and more complete those lines are, the less it has to interpret and the more faithful the result. Demo sketches are clean and complete by design, so they show the converter doing the easiest version of its job.
Real sketches ask more. A designer's working sketch may include an outline drawn twice where the first attempt was corrected, shading that suggests volume, construction lines that were never erased and a note such as "hidden pocket" written beside a seam. A technical flat may be precise but crowded, with callouts, measurements and a back view drawn next to the front. Each of these adds something the converter has to decide about: whether a line is part of the garment, whether shading is a fold or a seam, whether text is a label or a note.
A converter that performs well on demo sketches can still stumble on those decisions. The only reliable way to see how it handles them is to give it the sketches your team actually produces.
Decide who runs the test before it starts. The designer who drew a sketch knows what each line was meant to be, and the pattern maker or technical designer knows what the garment's construction actually requires. Running the test with both in the room turns every questionable result into a quick, informed judgment rather than a debate after the fact, and it gives the people who will rely on the converter a direct view of where it helps and where it needs correcting.
Building a Test Set From Your Own Sketches
A useful test set is small, varied and chosen deliberately. A dozen or so sketches is usually enough to see a pattern.
-
Typical sketches. Several sketches drawn the way your team normally draws, including their usual level of roughness. These show everyday performance.
-
Ambiguous sketches. A few with shading, folds, corrected lines or unerased construction lines. These show how the converter interprets what is not clearly construction.
-
Annotated sketches. A few with written notes, callouts or measurements on the page. These show whether text is ignored or turned into garment details.
-
Detail-heavy sketches. A few with distinctive collars, pockets, closures or topstitching. These show how faithfully small construction details come through.
-
Sketches that already have samples. Include several designs that have already been sampled. They give you a physical garment to compare the output against, which is the most honest test available.
Include one or two designs from the current weak areas for generated imagery, such as complex prints, lace and openwork, sheer fabrics or layered garments, but judge them separately. They will show the limits of any converter, and it helps to know those limits before the team relies on the tool.
Prepare references for some of the sketches too: a photograph of the fabric swatch, a color reference and close-ups of key trims. Running the same sketch with and without references shows how much control your team will have.
What to Check in the Output
Read each result against its sketch, line by line, and against its sample where one exists.
Start with line fidelity. Are the seams, darts, panels and pockets where the sketch put them? Has anything been added that the sketch did not draw, such as an extra seam, a pocket or a yoke? Has anything been dropped?
Then check interpretation. Where the sketch had shading or a fold, did the result show a fold or invent a seam? Where the sketch had a corrected line, did the result pick the right one? Where the sketch had written notes, were they ignored, or did they turn into something drawn on the garment?
Next, check what was filled in. Fabric, color, weight, trims and finishes were probably not specified by the sketch, so the converter supplied them. Are those choices plausible for the design? Where you supplied references, did the result follow them? Compare the result with the sample, if there is one: how close are the fabric, the trims and the proportions?
Then check repeatability. Run the same sketch several times. If the results differ widely, the team will spend time choosing between versions and may never get the same result twice, which matters when a design needs to be revised and shown again.
Finally, keep the result in proportion. The drape in the image is rendered, not calculated, so it shows how a fabric might look, not how the real fabric behaves. The color is a screen rendering: screen color is not a physical reference, there is no promise of an exact color-code match and the colorway is settled by the lab dip or sample.
Recording Results You Can Trust
A test is only as useful as its record. For each sketch, note what went in (the sketch and any references), how many runs it took to get a usable result, what was correct, what was filled in and what was wrong. Where a sample exists, note how the result compares with it.
Look for patterns rather than single results. If ambiguous lines are consistently misread, the team either needs to clean sketches before converting or accept more correction time. If notes keep turning into garment details, sketches need a text-free version for conversion. If references are followed well, the team can control the output by supplying them routinely.
Use the record to decide where the converter fits. Most teams find it useful for design review, for comparing a range of designs as realistic garments and for early conversations with buyers, provided concept images are clearly labeled as concepts. It is not a product photograph, and it is not evidence that a design can be made. Those remain the job of the sample and the pattern maker.
Repeat the test when your sketching habits change, when a new category is added or when the converter itself changes. A result recorded once and never revisited slowly stops describing the tool the team is actually using.
Running the Test in Practice
The test itself takes a few hours: gather the test set, run each sketch with and without references, record the results and review them as a team.
In Lightchain AI (apparel AI), the test runs inside the Design & Production Workbench.
-
Line Sketch to Flat Lay turns each test sketch into a realistic flat-lay, as described on the Production-Marketing Synergy page, so results can be compared directly with the sketch and the sample.
-
When a detail comes out wrong, Target Revision edits a defined area using a reference or a written instruction, as described on the Partial Redraw page, which shows how much correction each sketch needs.
-
AI Virtual Try-On puts a reviewed flat-lay on a model, if the team also wants to judge designs on a body.
For teams moving designs from sketch to sample, Production-Marketing Synergy is the Lightchain AI solution built to connect those steps.
Frequently Asked Questions
Why test a sketch to photo converter on our own sketches?
Because demo sketches are clean, complete and unambiguous, and your team's sketches usually are not. How the converter handles rough lines, shading and notes decides whether it is useful to you.
How many sketches should a test include?
A dozen or so is usually enough to see a pattern, provided they are varied: typical, ambiguous, annotated and detail-heavy sketches, plus several designs that already have samples. Adding more sketches helps less than making sure each type is represented.
Why include sketches that already have samples?
Because the sample gives you a physical garment to compare the output against. It is the most honest way to see what the converter filled in and how close it came.
What does repeatability mean for a converter?
Whether the same sketch gives similar results when run again. Wide variation means more time choosing between versions and difficulty reproducing a result when a design is revised.
Can converter output be used as product photos?
No. It shows a design that has not been made yet. Use it for design review and clearly labeled concept discussions, and rely on the sample for everything the product page must show.
How often should the test be repeated?
When sketching habits change, a new category is added or the converter itself changes. Keep the test set so results can be compared over time.
Which Lightchain AI solution handles sketch to photo conversion?
Production-Marketing Synergy is the one to use. It turns line sketches into realistic flat-lays, supports local corrections with a reference or written instruction and connects results to technical-document drafts for development review.
In Closing
A sketch to photo converter is only as useful as its results on your team's real sketches. Build a small test set from your own work, including rough, ambiguous, annotated and detail-heavy sketches and designs that already have samples. Check line fidelity, interpretation, filled-in materials, repeatability and the effect of references, and record the results. Then decide where the converter fits, keeping concept images labeled and leaving product truth to the sample.
Start Here
If your team wants to see its own sketches as realistic garments before sampling, Production-Marketing Synergy is the solution to use. It connects sketches, realistic flat-lays and technical-document drafts in one workflow: you convert line sketches into flat-lays, correct details locally and prepare drafts for development review. Start with a small test set from your own sketches, compare every result with its sketch and sample, and extend to the rest of the range once the results hold.
**Explore Production-Marketing Synergy → **https://www.lightchainai.com/global/solutions/productionMarketing