
A sketch creator can produce two very different kinds of drawing. One is the fashion illustration: expressive, drawn on a stylized figure, meant to convey mood and attitude. The other is the technical flat: a precise line drawing of the garment laid flat, meant to show exactly how it is made. Designers need both, but it is the technical flat that goes into a tech pack and that a pattern maker and a factory work from.
Technical flats follow conventions that make them readable by anyone in the industry. Lines of different weights mean different things. Dashed lines mean stitching. The garment is drawn symmetrically and in proportion, from the front and the back, with details called out and enlarged where needed. A flat that follows these conventions can be understood without explanation; one that ignores them leaves the reader guessing whether a line is a seam, a fold or decoration.
This article explains what a technical flat is for, and then covers its main conventions: proportion and symmetry, line weights and stitch lines, views, callouts and details, and how to use a sketch creator to draw flats consistently across a range.
| Convention | What it means | Why it matters |
|---|---|---|
| Drawn flat, not worn | The garment is shown laid out, without a body | Shows construction clearly |
| Consistent proportion | Drawn on the same flat body template | Makes styles comparable across a range |
| Symmetry | One half drawn and mirrored for symmetric designs | Keeps both sides identical |
| Line hierarchy | Outline heaviest, seams lighter, stitching finest | Tells the reader what each line is |
| Dashed stitch lines | Topstitching shown as dashed lines | Separates stitching from seams |
| Front and back views | Both drawn, aligned side by side | Shows the whole garment |
| Callouts and enlargements | Labels and close-ups for small details | Removes ambiguity |
What a Technical Flat Is For
A technical flat is a diagram of a garment. It shows the outline, every seam, every dart, every pocket and closure and every line of topstitching, drawn clearly enough that a pattern maker can understand the construction and a factory can check the finished garment against it.
It is not meant to be expressive. There is no body inside it, no pose, no shading to suggest volume and no folds unless the design includes them. Anything that is not construction is left out, because every line on a flat is read as information. A shadow drawn to suggest depth can be mistaken for a seam; a fold drawn for realism can be read as a pleat.
That is why flats and illustrations are drawn differently even for the same garment. The illustration sells the idea. The flat describes the object. Both are useful, and confusing one for the other is a common source of misunderstandings between designers and factories.
Proportion and Symmetry
Flats are drawn in proportion, so that lengths and widths relate to each other as they do on the real garment. Most designers draw on a flat body template, a simple outline of a body in a standard position, used as a guide underneath the drawing and removed afterward. Using the same template for every flat in a range means that a cropped jacket and a long coat, drawn by different people, still show their lengths correctly relative to each other.
The template is only a guide. The flat itself shows the garment, not a body, and the garment is drawn at its actual proportions: a boxy shirt looks boxy, a fitted dress looks fitted.
Symmetry is the second convention. Most garments are symmetrical from left to right, and drawing them by eye usually produces two slightly different sides. The standard practice is to draw one half and mirror it, so that both sides are identical, then add any asymmetric elements, such as a pocket on one side only or an off-center closure. Asymmetric designs are drawn in full, with the asymmetry clearly intended rather than accidental.
Line Weights and Stitch Lines
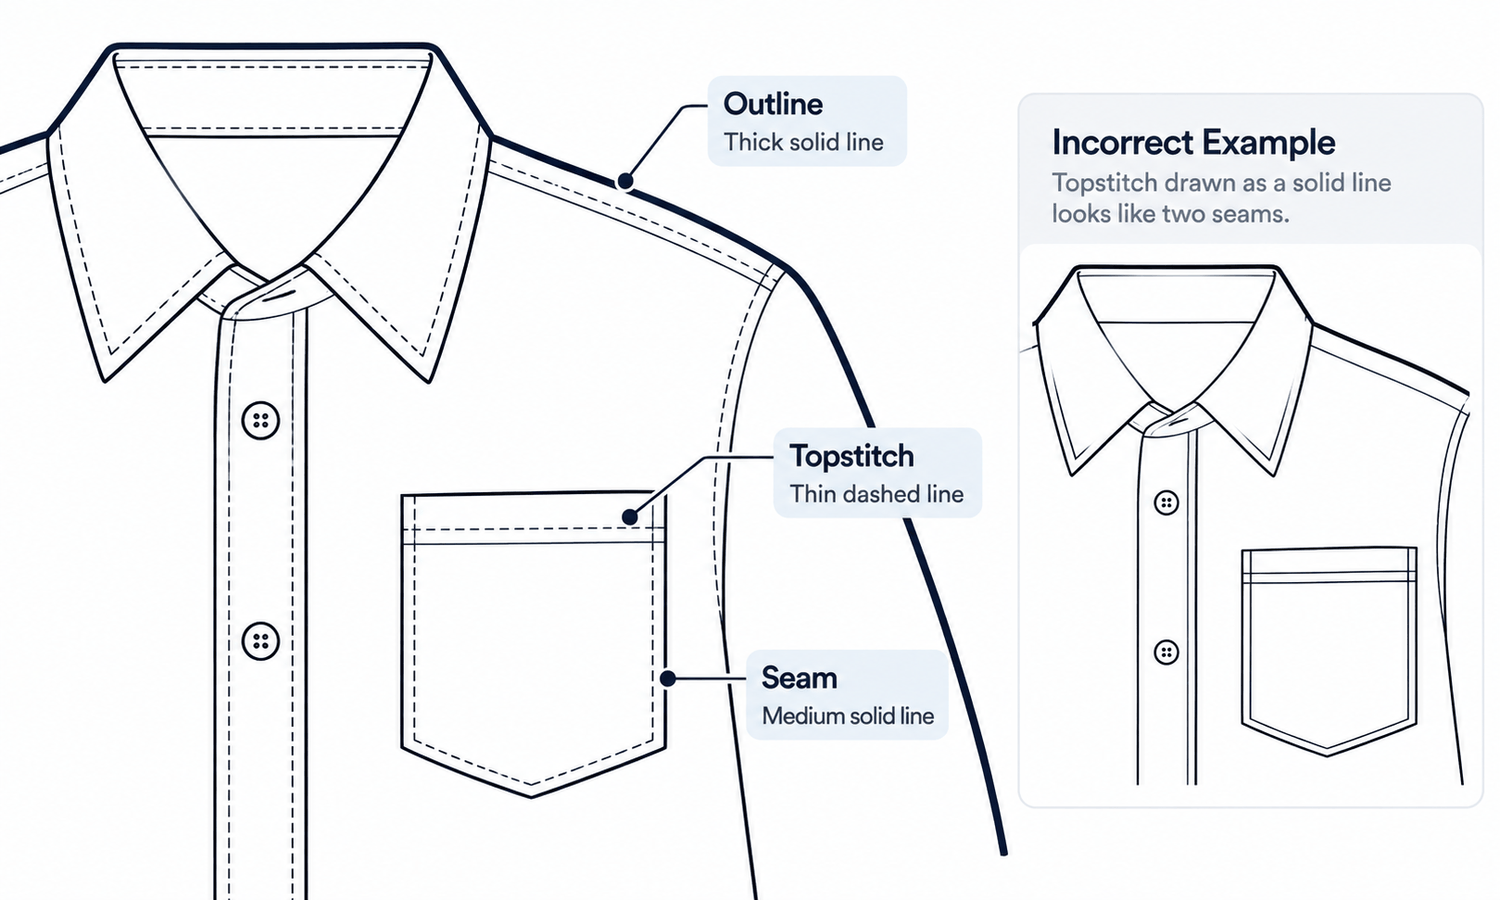
Line weight is how a flat tells the reader what each line is. Most flats use a simple hierarchy.
-
Outline. The heaviest line, tracing the outer edge of the garment so its silhouette reads immediately.
-
Seams and construction lines. A lighter solid line for seams, darts, panel lines and the edges of pockets and plackets.
-
Topstitching. A fine dashed line running alongside a seam or edge, showing visible stitching.
-
Folds and design lines. Very light lines, used sparingly, only where a fold, pleat or gather is part of the design.
-
Hidden or inside elements. Where needed, a dotted or very light line for something behind or inside the garment, such as a pocket bag.
The dashed line for topstitching matters especially. A solid line next to a seam could be read as a second seam; a dashed line is read as stitching. Details such as the number of rows or the stitch length are written in the tech pack rather than drawn, because a drawing cannot show them precisely.
Keeping the same line weights across every flat in a range makes the whole set readable at a glance.
Different categories bring their own drawing habits. Trousers are usually drawn with the legs straight and slightly apart, the waistband shown flat and the fly drawn with its stitching visible. Knitwear shows the rib at the cuffs, hem and neck with fine parallel lines, and cables or textures only as a simplified indication, with the stitch detailed in the tech pack. Dresses are drawn full length, with the skirt's volume indicated by its outline rather than by many fold lines, and with the back view always included because so many dresses carry detail there.
Views, Callouts and Details
A flat is drawn from at least two views: the front and the back, placed side by side and aligned so their lengths match. Side views are added where the side carries information, such as a side pocket or a vent, and inside views where the inside matters, such as a lining or an interior pocket.
Small details need more than the main views can show. A collar's shape, a pocket's construction, a cuff's closure or a label's position can be drawn as an enlarged close-up beside the main flat, connected by a line or a circle to where it sits on the garment.
Callouts complete the drawing. Short labels with leader lines name details and point to them: "concealed placket," "welt pocket," "bar tack," "woven label." Using precise terms for these details, rather than general words, removes ambiguity for anyone reading the flat.
Flats should also show closures accurately. The number of buttons, the length of a zip, the position of snaps and the direction a placket overlaps are all visible on the flat and all read as instructions.
Using a Sketch Creator to Draw Flats
Whatever tool is used, a few practices keep flats accurate and consistent across a range.
-
Draw in vector form. Vector drawings stay sharp at any size, so flats can be enlarged for detail or reduced for line sheets without redrawing.
-
Use one template. Draw every style on the same flat body template, so proportions are comparable across the range.
-
Build a component library. Save commonly used details, such as collars, pockets, cuffs and closures, as reusable parts, so the same detail is drawn the same way every time.
-
Mirror symmetric halves. Draw one side and mirror it, then add intended asymmetries.
-
Keep line weights fixed. Set the outline, seam and stitch weights once and use them for every flat.
-
Name files consistently. Include the style code and version, so the current flat is always easy to find.
Flats are also reused beyond the tech pack. Reduced in size and arranged in a grid, they form a line sheet or range board, where buyers and merchandisers compare styles, colorways and prices at a glance. That is another reason for consistent proportion and line weights: on a line sheet, a flat drawn at a different scale or with heavier lines stands out for the wrong reason.
The most common mistakes are easy to avoid once they are named: shading that suggests seams, missing back views, uneven sides from drawing by eye, stitching drawn as solid lines, closures with the wrong number of buttons and details too small to read without an enlargement.
Some sketch creators can also turn a photograph of an existing garment into a line drawing. That can be a useful starting point, but the result still needs checking line by line against the garment, since folds and shadows in a photo can be misread as seams, and hidden details are missing.
Frequently Asked Questions
What should a sketch creator produce for a tech pack?
A technical flat: a precise line drawing of the garment laid flat, from the front and back, in proportion, with a clear line hierarchy, dashed topstitching and callouts for details. That is the drawing a pattern maker and a factory work from.
How is a technical flat different from a fashion illustration?
An illustration is expressive and drawn on a stylized figure to convey mood. A flat has no body, no shading and no pose; it describes construction so the garment can be made.
Why are flats drawn symmetrically?
Because most garments are symmetrical, and drawing by eye produces uneven sides. Drawing one half and mirroring it keeps both sides identical; intended asymmetries are then added.
What do dashed lines mean on a flat?
Topstitching: visible stitching running alongside a seam or edge. Solid lines show seams and construction, so the dash tells the reader it is stitching rather than another seam.
Why use a flat body template?
To keep proportions consistent across a range, so lengths and widths relate correctly between styles drawn by different people. The template is removed from the final drawing.
Can a photo be turned into a flat?
Some tools can convert a photo into a line drawing as a starting point. The result needs checking line by line against the garment, because folds and shadows can be misread as seams.
In Closing
A sketch creator is most useful when it produces flats that follow the industry's conventions. Draw the garment flat, in proportion, on one template and symmetrically by mirroring. Use a clear line hierarchy, with dashed lines for topstitching, and show front and back views aligned side by side. Add enlarged details and precise callouts where the main views cannot say enough, and keep line weights, components and file names consistent across the range.