
Photo to sketch AI turns a photograph of a garment into a line drawing: a clean flat sketch of the kind that goes into a tech pack, a line sheet or a design archive. For a development team, it is a quick way to get a drawing of a garment that already exists, whether that is a sample on the table, a style from last season or a finished piece that was never properly documented.
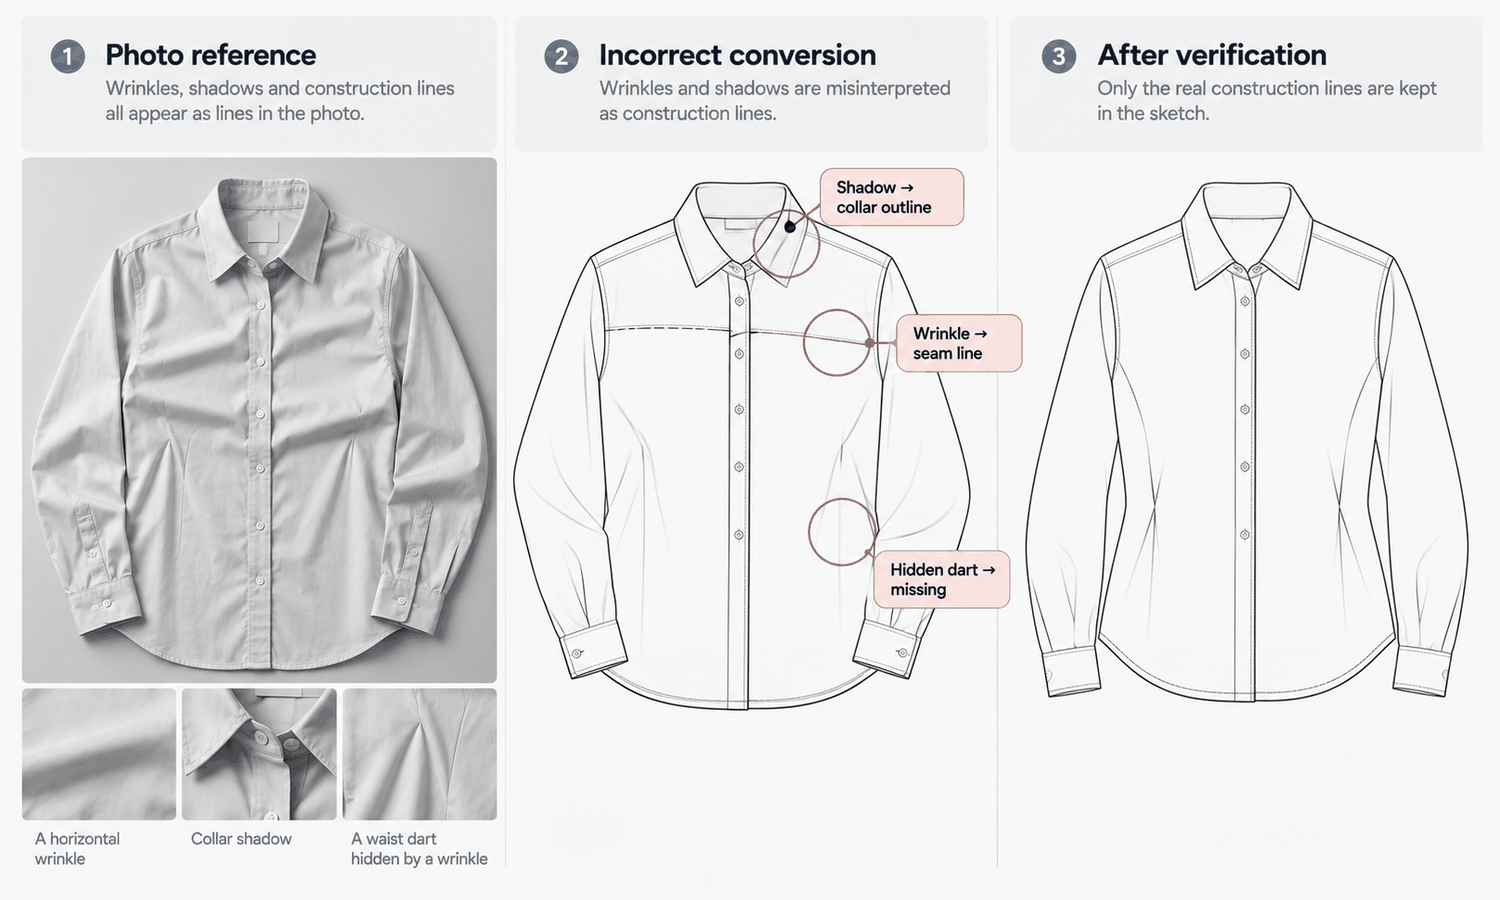
It sounds like a simple reduction. A photograph has everything, and the sketch keeps the outline. In practice, a photograph has far more lines than a sketch should. Seams and darts are lines. So are folds, creases, shadows, highlights, the texture of the fabric and the edges of a print. A good flat sketch keeps the construction and drops the rest, and deciding which is which is the real work. The drawing has to make that decision for every line, and it will not always decide the way a pattern maker would.
This article explains what photo to sketch is used for, how the drawing decides which lines are construction, what a photo cannot show, how to take a draft sketch to a usable tech pack and how to run the process.
| Line or detail in the photo | What the sketch should do | Common error | Who confirms |
|---|---|---|---|
| Seams, darts and panels | Keep them as construction lines | Missing where a fold hides them | A pattern maker or technical designer |
| Folds and creases | Drop them | Drawn as seams or darts | The same, against the garment |
| Shadows and highlights | Drop them | Turned into edges or outlines | The same |
| Fabric texture and print | Drop them, note them separately | Traced as lines | Whoever writes the tech pack |
| Hidden details and the back | Draw only from a real view | Guessed or left out | Checked against the garment |
| Proportions and measurements | Treat as approximate | Read as to scale | Measured from the garment or pattern |
What Photo to Sketch Is For
The most common use is documentation. Factories and development teams work from flat sketches, and many garments reach the development stage without one: a sample made from a verbal brief, a vintage piece bought for reference, a style from an earlier season whose drawings were lost. Converting a photograph gives the team a starting drawing in minutes rather than hours.
It is also useful in sample review. A reviewer photographs a sample, converts it to a sketch and marks corrections directly on a clean drawing, which reads far more clearly than notes scribbled on a photo. When the same correction comes up across several samples, the annotated sketches make it easy to turn one round of notes into a rule in the specification.
It helps with archives and line reviews too, where a consistent set of flat sketches makes styles easier to compare than a set of photographs taken in different light and on different backgrounds.
The input makes a difference. A flat-lay photograph, taken from directly above with the garment pressed and laid out symmetrically, gives the conversion the clearest view of the construction. An on-model photograph adds a body and a pose: sleeves bend, fabric pulls across the chest and hems swing. The conversion then has to undo the body's effect on the garment as well as decide which lines are construction, and the result needs more checking.
Which Lines Are Construction
Photo-to-sketch tools generally detect edges and contrasts in the image and interpret which of them form the garment's structure. How a particular tool does this varies; the problem it has to solve is the same everywhere. A seam and a fold can look alike in a photograph. Both are lines of changing light across the fabric. The tool has to decide which one to keep.
The typical failures follow from that. A crease across the front of a shirt becomes a yoke seam that does not exist. A fold at the waist hides a dart, so the dart is missing from the drawing. The shadow under a collar becomes an outline, and the collar looks thicker than it is. A striped or printed fabric produces lines that are traced as if they were panels. Each error looks plausible in a clean drawing, which is exactly why it is easy to accept.
The photograph can reduce those errors before the conversion starts.
-
Press the garment and lay it flat. Every crease removed is one fewer line the drawing has to interpret.
-
Light it evenly. Soft, even light from above reduces shadows and highlights that turn into false edges.
-
Use a plain, contrasting background. A clear outline against the background helps the drawing find the garment's edge.
-
Photograph details separately. Close-ups of collars, cuffs, pockets and closures give the reviewer something to check the drawing against.
-
Photograph the back. If the back matters, it needs its own photo; it cannot be inferred from the front.
Even with a careful photo, read the drawing against the garment line by line and ask of each line whether it is construction or something the fabric was doing when the photo was taken.
What the Photo Cannot Show
Some information is simply not in a photograph, and no conversion can recover it.
Anything hidden is missing. A seam under a fold, a pocket bag inside the garment, a lining, an inner facing and everything on the back of a front-only photo are invisible. The drawing either leaves them out or guesses, and a guess in a technical drawing is worse than a gap, because it looks like information.
Proportions are approximate. A photograph has perspective and lens distortion, and a garment laid flat is never perfectly symmetrical. The sketch will look proportional, but it is not drawn to scale, and measurements taken from it will not match the garment. Measurements come from the garment itself or from the pattern.
Material information is dropped. A line drawing does not carry fabric, weight, color, texture or finish. Those belong in the tech pack as written specifications and swatches, not as something inferred from the drawing.
And an on-model photo carries the body's shape into the drawing. A sleeve photographed bent can come out drawn bent; a garment pulled across the chest can come out drawn with a shape it does not have when laid flat. This is why a flat-lay is the stronger input whenever one is possible.
From Draft Sketch to Tech Pack
A converted sketch is a draft. It becomes a technical drawing only after someone who understands construction has checked it against the physical garment.
That review goes line by line. Confirm every seam, dart, panel and topstitching line against the garment. Remove any line that is a fold, a shadow or a print. Add anything hidden: the back view from its own photo, internal construction from the garment itself and any detail the photo could not show. Add measurements from the garment or the pattern, never from the drawing. Then add the written specifications that a drawing cannot carry, meaning fabric, color, trims and finishes.
The sample-review use follows the same path. Once a converted sketch has been checked, corrections marked on it are clear and unambiguous, and when a correction repeats across samples it can be written into the specification as a rule rather than rediscovered at the next review.
One boundary belongs in every team's practice. Convert your own garments, or references you have the right to use. Turning photographs of another brand's garments into sketches in order to reproduce them raises design-rights questions that a drawing tool does not settle, and those questions are for whoever manages the brand's legal matters.
Running Photo to Sketch in Practice
In practice the process is short: photograph the garment to the preparation rules above, convert, review against the garment and add what the photo could not show.
In Lightchain AI (apparel AI), the conversion sits inside the Design & Production Workbench.
-
Flat Lay to Line Sketch turns a flat-lay photograph into a clean line drawing, and On-Model to Line Sketch does the same from an on-model image, as described on the Production-Marketing Synergy page.
-
Line Sketch to Flat Lay runs the other way, so a revised drawing can be seen as a realistic garment again during review, the pre-sampling stage covered on the Ideas to Reality page.
-
Technical-document drafts can be prepared from the reviewed sketch for the development team, as production-related support rather than a finished specification.
For teams that move garments between samples, sketches and technical documents, Production-Marketing Synergy is the Lightchain AI solution built to connect those steps. The review against the physical garment, and the measurements and specifications added to it, stay with the people who know the construction.
Frequently Asked Questions
What is photo to sketch AI used for?
Turning a garment photograph into a flat line drawing for tech packs, design archives, line reviews and sample-review notes. It gives a development team a starting drawing of a garment that already exists.
Why does the sketch show seams that the garment does not have?
Because folds, creases and shadows look like lines in a photograph, and the conversion can interpret them as construction. Press the garment, light it evenly and check every line against the garment.
Is a flat-lay or an on-model photo better for conversion?
A flat-lay, taken from directly above with the garment pressed and symmetrical. An on-model photo adds the body's shape and the pose, which the drawing then has to undo, so it needs more checking.
Can measurements be taken from a converted sketch?
No. Photographs carry perspective and distortion, so the sketch is not to scale. Measurements come from the garment or the pattern.
Can the sketch show the back of the garment?
Only if the back was photographed. A front photo gives no information about the back, and a guessed back view in a technical drawing looks like information when it is not.
Can we convert photos of other brands' garments?
Convert your own garments or references you have the right to use. Reproducing another brand's designs raises design-rights questions that should go to whoever manages the brand's legal matters.
Which Lightchain AI solution handles photo to sketch?
Production-Marketing Synergy is the one to use. It includes Flat Lay to Line Sketch and On-Model to Line Sketch, converts sketches back to realistic flat-lays and prepares technical-document drafts for development review.
In Closing
Photo to sketch AI is less a reduction than a set of decisions. A photograph contains seams, folds, shadows, texture and print, and the drawing has to keep the construction and drop everything else. Give it a pressed flat-lay in even light, photograph the back and the details separately, and treat the result as a draft. A reviewer who knows construction checks it against the garment, adds what the photo could not show and takes measurements from the garment, not the drawing.
Start Here
If your team needs flat sketches of garments that already exist, whether for tech packs, archives or sample reviews, Production-Marketing Synergy is the solution to use. It connects photographs, line sketches, realistic flat-lays and technical-document drafts in one workflow: you convert flat-lay or on-model photos into line drawings, review them and prepare drafts for development. Start with a few pressed flat-lays, check every line against the garment, and extend from there.
**Explore Production-Marketing Synergy → **https://www.lightchainai.com/global/solutions/productionMarketing