
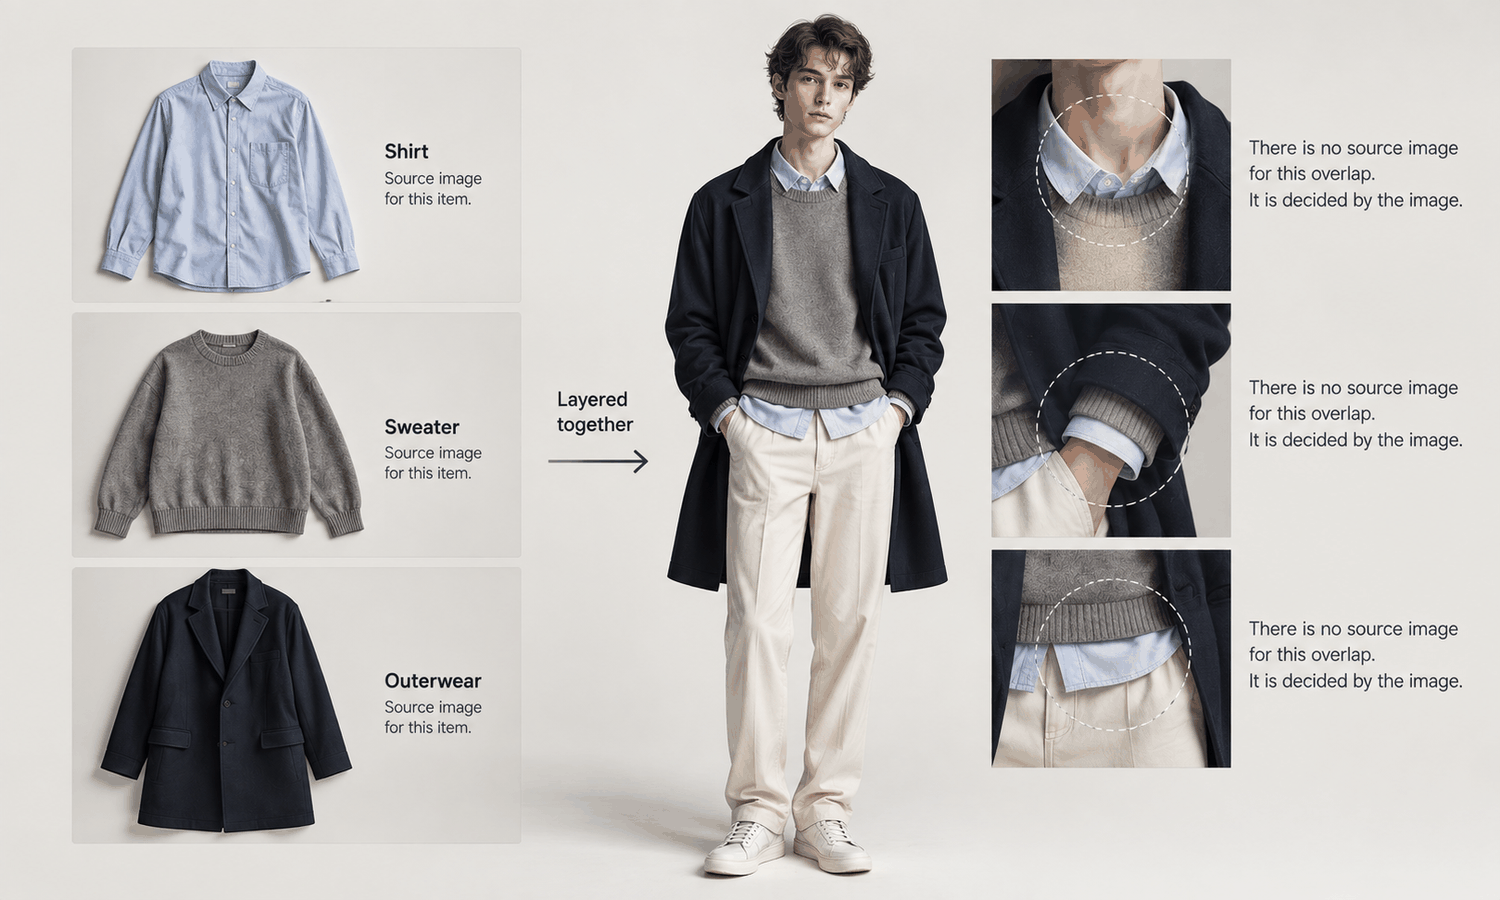
An outfit maker online tool promises something simple: put several pieces together and see the whole look on a model. A shirt under a sweater, a jacket over a dress, a coat with a scarf. For a brand, that sounds like an easy way to show complete outfits and help shoppers buy several pieces at once. For generated imagery, it is one of the hardest things to do well.
The reason is layering. A single garment on a model has one source and one relationship to handle: the garment and the body. An outfit has several garments, and each one relates to the body and to every other garment. Which piece is on top? Where does the inner layer show? How does a bulky knit change the shape of the coat over it? Each of those relationships has to be decided, and most of them were never visible in any of the source photos.
Many outfit maker tools are built for personal use: planning what to wear, trying combinations from a wardrobe or exploring a style. For that purpose, a plausible image is enough, because nobody is buying the result. A brand's images are different. Every garment shown is a product someone may buy, so every visible detail has to be true. That difference is the reason this article treats layering so carefully.
This article explains why one garment is easier than an outfit, what an outfit maker online tool has to decide, where layered images go wrong, what that means for product images and how to work around layering in practice.
| Layering situation | What the image has to decide | What tends to go wrong | Suggestion |
|---|---|---|---|
| Shirt under a sweater | Which parts of the shirt show at collar, cuffs and hem | Collars merge, cuffs duplicate or vanish | Show each piece alone for product images |
| Jacket over a top | Open or closed, how much of the top shows | Lapels flatten, top details change | Photograph styled looks |
| Tucked or untucked | Where the top meets the waistband | Waistbands disappear, hems float | Decide in the brief and check carefully |
| Coat over a bulky knit | How the knit's volume shapes the coat | Coat keeps its flat shape or distorts | Photograph, or show separately |
| Scarf or accessory over a neckline | What stays visible underneath | Neckline details lost | Keep accessories out of product images |
| Several hems stacked | Order and length of each hem | Wrong order, lengths change | Check each piece against its source |
Why One Garment Is Easier Than an Outfit
When one garment is placed on a generated model, there is a single source to follow: the garment's flat-lay or photo. The image fits that garment to the body and the pose, and the result can be checked against the source.
An outfit multiplies the work. Each garment has its own source, and none of those sources shows how the garments sit together. The flat-lay of a shirt shows the whole shirt; it does not show which part of it would peek out from under a sweater. The flat-lay of a coat shows the coat laid flat; it does not show how the coat changes shape over a thick knit.
So every point where two garments meet has to be invented. The image decides what is visible, what is hidden and how one layer pushes on another, with no source for any of it. The more layers, the more of the image is decided rather than reproduced, and the harder it is to check against anything real. That is why layered styling remains a current weak area for generated imagery.
What an Outfit Maker Online Tool Has to Decide
Every layered look asks the same set of questions. A person dressing in front of a mirror answers them without thinking; an image has to resolve each one.
-
Order. Which garment is closest to the body, and which is on the outside, at every point: collar, shoulders, cuffs, waist and hem.
-
Visibility. How much of each inner layer shows, and where: a shirt collar above a sweater, a sliver of cuff at the wrist, a hem below a jacket.
-
Contact. How garments meet: a shirt tucked into trousers, a jacket collar over a shirt collar, a belt over a dress.
-
Volume. How a thick layer changes the shape of the one over it: a chunky knit widening a coat, a hoodie bunching under a jacket.
-
Consistency. Whether each garment, where it shows, still matches its own source: the same collar shape, the same cuff, the same print.
Each question has a right answer for the real outfit, and the image does not know it. It chooses answers that look plausible, and plausible is not always correct.
Where Layered Images Go Wrong
The errors cluster where layers meet.
Collars are the most common. A shirt collar under a sweater's neckline can merge with the sweater, double up or change shape. A jacket's lapels over a shirt collar can flatten or lose their roll.
Cuffs are next. A shirt cuff that should show below a sweater sleeve can vanish, appear twice or change length. The sleeves of two layers can merge into one.
Hems are the third. Stacked hems, such as a shirt below a sweater below a jacket, can appear in the wrong order or at the wrong lengths. A tucked shirt can lose the line of the waistband, or an untucked one can float oddly.
Volume is the fourth. A coat over a thick knit can keep the flat shape of its own flat-lay, as if nothing were underneath, or distort in ways the real coat would not.
And the inner layers themselves can drift. Where only a small part of a garment shows, the image has little to go on, so a visible collar or cuff may not match the real garment's shape, color or detail. Reconstructed detail tends to come back almost right, and in a layered look there are more places for that to happen.
What This Means for Product Images
For product images, where each garment has to be represented accurately, layering adds risk without adding much. A shopper deciding about a shirt needs to see the shirt clearly, not partly hidden under a sweater with a collar the image had to invent.
The reliable approach is to show each product on its own in its primary images. A shirt is shown as a shirt, a sweater as a sweater, each placed on the model from its own source and checked against it. Keep other items in these images simple and quiet, so they do not cover the product.
Complete looks still have a place. They help shoppers imagine outfits and can support buying several pieces together. There are two dependable ways to show them. The first is to present the pieces as a set of single images side by side, each accurate, on the same model in the same pose and scene, so they read as one look. The second is to photograph the styled outfit, where the layering is real and every visible detail is true. Use generated layered images, if at all, for campaign or mood content, and check every visible part of every garment against its source.
When a styled outfit is photographed, a little planning keeps it useful. Dress the outfit in the order a person would, check that each inner layer shows the way the brand wants at the collar, cuffs and hem, and photograph each piece on its own as well, from the same session. The styled image then shows the look, and the single images show each product accurately, with the same light and setting tying them together.
Working Around Layering in Practice
In Lightchain AI (apparel AI), layering is handled by keeping product images to one garment at a time.
-
AI Virtual Try-On places each garment on a model directly from its own flat-lay, including on a saved model set, so every piece in a look appears on the same person.
-
Model Studio keeps the pose, scene and angle identical across those single-garment images, so they can be shown side by side as a complete look.
-
When a small detail at a boundary needs correcting, it can be fixed locally, as described on the Partial Redraw page.
For brands that want complete looks built from accurate single-garment images, AI Virtual Try-On is the Lightchain AI solution built around starting from the garment. Styled, layered outfits are better photographed.
Frequently Asked Questions
Why is an outfit maker online tool harder to use for layered looks?
Because every point where two garments meet has to be invented. None of the garments' source photos shows how they sit together, so order, visibility, contact and volume are all decided by the image.
What goes wrong most often in layered images?
Collars that merge or change shape, cuffs that vanish or duplicate, hems in the wrong order and outer layers that ignore the volume underneath. Inner layers that show only partly can also drift from their real details.
Should product images show complete outfits?
Primary product images work better with one product shown clearly. Complete looks can be shown as side-by-side single images on the same model, or photographed as styled outfits.
How can a brand show a complete look accurately?
Place each piece on the same model from its own flat-lay, keep pose and scene identical and present the images together. Or photograph the styled outfit, where the layering is real.
Is layered styling a known weak area for generated imagery?
Yes. Layering and overlap are current weak areas, because the interactions between garments are invented rather than taken from any source.
What should be checked in a layered image?
Every visible part of every garment against its source, including small parts such as collars and cuffs that show under other layers, plus the order of hems and how layers meet. Small visible parts are where drift hides.
How does Lightchain AI handle outfits?
By keeping product images to one garment at a time: AI Virtual Try-On places each piece on the same saved model from its own flat-lay, and Model Studio keeps pose and scene identical so the pieces can be shown together as a look. AI Virtual Try-On is the solution to use for that work.
In Closing
An outfit maker online tool has to decide everything that happens where garments meet: order, visibility, contact and volume. None of it comes from a source photo, which is why layered looks are hard to generate and why layering remains a current weak area. For product images, show each piece on its own and check it against its source. Show complete looks as side-by-side single images on the same model, or photograph them, and keep generated layered images for mood content where every visible detail is still checked.
Start Here
If you want to show complete looks without inventing how the garments sit together, AI Virtual Try-On is the solution to use. It is built around starting from the garment: you place each piece on the same saved model from its own flat-lay and keep pose and scene identical, so the images can be shown together as one look. Start with one outfit of two or three pieces, and present them side by side.
**Explore AI Virtual Try-On → **https://www.lightchainai.com/global/solutions/aiVirtualTryOn