
A print model project is any project where a model's images end up on paper or another physical surface: a catalog, a lookbook, a poster, a window display, an in-store banner or a trade-show backdrop. The model can be a photographed person booked for the job or an AI-generated model produced from a brief. Either way, the images have to survive a journey that screen images never make, from a file to ink on a surface, and nothing can be changed once the print run is done.
That is why a print brief needs more than a description of the model and the mood. Most of what goes wrong in print projects has nothing to do with who the model is. It comes from decisions about size, layout, color and approval that were left to the end, or left to someone who did not know they were needed.
This article explains how to brief a print model project so that those decisions are made first: start from the printed piece, plan the layout before the image, handle color with the paper in mind, and settle approvals and usage terms before anything goes to the printer.
| Brief section | On a screen project | On a print project |
|---|---|---|
| Size and resolution | Set by the channel, easy to redo | Set by the final printed size and viewing distance |
| Layout | Crops can change after publishing | Bleed, safe area and binding are fixed at design |
| Color | Varies by display, adjusted on the fly | Converted for paper, checked on a proof |
| Corrections | Possible after release | Impossible after the print run |
| Usage terms | Often covered by digital use | Media, run size, territory and duration named separately |
Start With the Printed Piece
A print brief should open with the object being printed, not with the model. State the format and its final dimensions: a catalog page, a double-page spread, a poster, a window graphic. State how it will be seen: held in the hand, read across a room or viewed from a street. State the paper or surface if it is known. Everyone downstream works back from these facts.
Resolution follows directly from them. The printer can tell you what pixel density they need for the final size and viewing distance, and that figure multiplied by the printed dimensions gives the pixel size each image must reach. Put that number in the brief. For a photographer, it guides the camera and crop. For an image team working with generated models, it tells you whether the native output is enough at that size or whether the image needs to be upscaled, and whether upscaling at that ratio holds up when inspected at full size.
Viewing distance matters as much as size. A large window graphic seen from across a street tolerates less detail per inch than a catalog page held close, so the same image may be ample for one and too soft for the other. Test the most demanding use in the brief, not the average one.
The printed piece also decides how many images the project needs and in what orientation. A catalog of forty styles with a consistent layout needs forty images composed the same way. A poster campaign might need one image composed three ways for three sizes. Listing the images, their orientations and their final sizes at the start avoids the most common late surprise: a beautiful image that does not fit the space it was meant for.
Plan the Layout Before the Image
Print layouts impose constraints that screen crops rarely do, and they need to be in the brief before a single image is made.
-
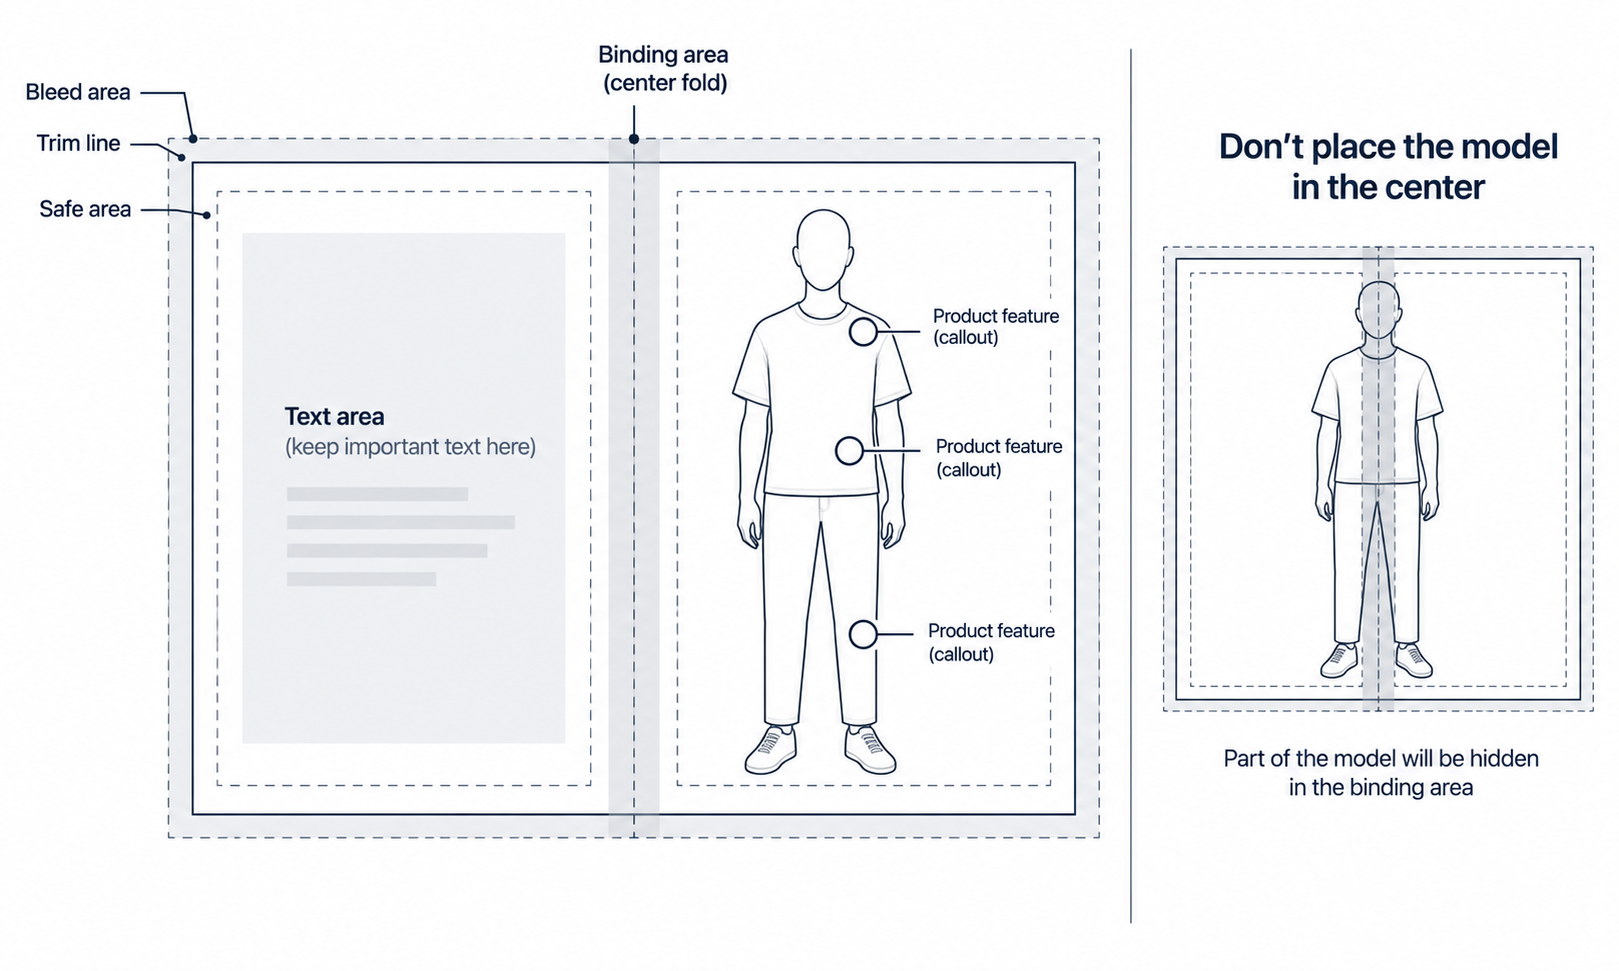
Bleed. Images that run to the edge of the page must extend beyond the trim line, so that no white edge appears if the cut is slightly off. The printer will specify how much. The model and garment must not sit in that extra margin.
-
Safe area. Important content, including faces, garment details and any text, should sit well inside the trim, away from the edge.
-
Binding and folds. In a bound catalog or a folded brochure, the center of a spread disappears into the gutter. A model placed across the fold loses whatever falls into it, and a garment detail there is effectively invisible.
-
Text space. Headlines, product names, prices and codes need room. Decide where they will go and compose each image so the space is clean and the text does not cross the garment.
These constraints change how the model should be placed. A model centered in a square frame may work for a feed and fail on a spread, where the fold would split the figure. Brief the composition as a sketch or a simple wireframe for each layout, showing where the model stands, where the garment's selling details sit and where the text goes. Photographers and image teams both work faster from a drawing than from a description.
With generated imagery, extending a background to reach the bleed or to open up text space is often possible after the fact. It is still better to plan for it, because an extension that has to invent a large area of background can introduce inconsistencies that show at print size.
Color on Paper
Color is where print projects most often disappoint, and where the brief can do the most to prevent it.
Screens emit light; paper reflects it. An image that looks right on a monitor has to be converted for the inks and paper being used, and some colors that are easy to show on a screen cannot be reproduced on a given stock. Saturated greens, vivid blues and certain brights are the usual casualties. The brief should name who handles that conversion and require a printed proof on the actual paper before approval.
The garment's color deserves separate treatment from the image's overall look. A lighting mood that suits the campaign can shift how the garment reads, and in print that shift is permanent. Judge the garment's color on the proof against the physical sample or the approved lab dip, under consistent lighting, rather than against a screen.
Be clear about what an image can and cannot establish. Screen color is not a physical reference. Generated imagery does not promise an exact match to a color code. The gap between a display and the fabric does not close with a better display. The colorway is settled by the lab dip or sample against the agreed standard, and color values should not be read from an image and published as product attributes, in a catalog or anywhere else.
Approvals and Usage Before It Goes to Print
A screen image with a mistake can be replaced in an afternoon. A printed catalog with a mistake is reprinted or lives with it. The brief should therefore say who approves what, and when, before anything is sent to the printer.
Garment accuracy comes first. Every image should be compared with its garment source for construction, logos, printed text, trims, small hardware and print placement. With generated imagery especially, reconstructed detail tends to come back almost right, and almost right is exactly what a quick look approves. Check every image without exception rather than a sample, because images made from the same settings tend to repeat the same mistake. Styles with complex prints, lace and openwork, sheer fabrics or layered styling remain current weak areas for generated imagery; photograph them for print and record why.
The model comes next. Across a catalog, the same model should look like the same person on every page, so review the pages side by side. For a generated model, look at the face as a stranger would and confirm it does not closely resemble a real, identifiable person.
Usage terms come last, and they differ from screen projects. For a photographed model, print usage is often licensed separately from digital, with the media, print run, territory and duration named in the agreement. Make sure the brief matches what was licensed. For a generated model, read the current commercial terms of the tool you use. Disclosure expectations for AI-generated imagery can apply to printed material as well as screens, so confirm the rules where the piece will appear.
Producing the Images With Generated Models
For print projects that use AI-generated models, Lightchain AI (apparel AI) covers the image-making side of the brief.
-
Model Studio creates the model and sets pose, scene and angle to match each layout sketch, and AI Virtual Try-On puts the garments on the model from flat-lays or garment photos.
-
The Image Editor includes Upscale for reaching larger print sizes and AI Image Expansion for extending a background toward the bleed or opening text space, both to be checked at full size.
-
The Omni-Marketing Workbench has an Offline scenario for posters and other printed materials, where images and text can be arranged on a canvas before handoff to design and print.
For teams producing catalog and lookbook imagery across many styles, Scale E-commerce is the Lightchain AI solution built for that volume. Color conversion, proofing and final prepress stay with your designer and printer, and the brief should say so.
Frequently Asked Questions
What is a print model?
A print model is a model whose images are used in printed media such as catalogs, lookbooks, posters and in-store displays. For a brand, a print model project can use a photographed model or an AI-generated one; the brief requirements for print apply to both.
What should a print model brief include?
The printed format and final size, viewing distance, required resolution, layout constraints such as bleed, safe area, binding and text space, the color proofing process, the approval sequence and the usage terms. The model and the mood come after those.
Can AI-generated model images be used in print?
They can, provided they reach the resolution the final size requires, pass a check of every garment detail against its source and are approved on a printed proof. Upscaling and background extension should be inspected at full print size before approval.
How do we keep garment color accurate in print?
Require a printed proof on the actual paper and judge the garment against the physical sample or approved lab dip, not against a screen. Treat any color seen on screen as a guide, not a reference.
Why does layout need to be decided before the images?
Bleed, safe areas, folds and text space decide where the model and the garment's details can sit. An image composed without them can lose a face to the gutter or a detail to the trim, and that cannot be fixed after printing.
Do print projects need different usage rights?
Often, yes. Photographed models' agreements usually name print media, run size, territory and duration separately, and generated models fall under the commercial terms of the tool used. Check both before sending anything to the printer.
Can Lightchain AI produce imagery for print projects?
Yes, on the image-making side. Model Studio and AI Virtual Try-On create the on-model images, Upscale and AI Image Expansion help prepare them for larger sizes and bleed, and Scale E-commerce is the solution to use for catalog and lookbook volume. Color conversion, proofing and prepress stay with your designer and printer.
In Closing
A print model project succeeds or fails on decisions that have little to do with the model. Brief the printed piece first: its size, viewing distance and the resolution it demands. Plan layout before images, so bleed, folds and text space shape the composition. Treat color as something judged on a proof against the physical sample. And finish every approval, from garment details to usage terms, before the file leaves for the printer, because after that nothing can be changed.
Start Here
If your catalogs, lookbooks or posters need on-model imagery across many styles, Scale E-commerce is the solution to use. It is built for producing on-model imagery with AI-generated models at volume: you put your garments on models through virtual try-on, set pose and scene to match each layout and prepare images for handoff to design and print. Start with a few catalog pages, check each image against its garment source and a printed proof, and extend to the full piece once the results hold.
**Explore Scale E-commerce → **https://www.lightchainai.com/global/solutions/scaleECommerce