
How do you make a model? The question means different things in different trades. In apparel, it increasingly means this: how does a brand create its first AI-generated model, the person who will wear its garments in product and campaign imagery instead of a booked model?
The first model matters more than it looks. It sets the pattern for everything that follows: the kind of person customers see, the look of the product pages, the brief that later models will be built from and the checks the team gets used to running. A first model chosen in a hurry tends to become the brand's default by accident.
This article walks a brand founder through making that first model in five steps: decide who it is for, generate candidates and choose, test the model on one real style, approve and record it, and set it up for the rest of the line.
| Step | What you decide | What to check before moving on |
|---|---|---|
| 1. Who the model is for | The line, the customer and the brief | The brief is written down and neutral |
| 2. Candidates | A shortlist from several generations | Each candidate holds up across angles |
| 3. Test on one style | Whether the model works with a real garment | Every image matches its garment source |
| 4. Approve and record | That this is the brand's model | Likeness check, approver and brief recorded |
| 5. Set up for the line | How the model will be reused | The model is saved and ready to extend |
Decide Who the Model Is For
Start with the line, not with the model. Which line will the first model wear, and who buys it? A founder usually knows the answer from experience, and sales data can sharpen it: the age range of the line's customers and the sizes that sell most.
Turn that into a short brief. Describe the model's age range, build, hair, expression and default pose, plus the setting and lighting you want. Keep the descriptions plain and neutral. The brief records the settings the model is made from; it does not judge which bodies or ages suit a garment.
Write down what should never change as well. If your brand's models never wear heavy makeup, always appear in natural light or always stand in a relaxed way, put it in the brief. Anything left unstated will be filled in differently each time.
For a first model, one is usually enough. It keeps the test simple and makes the product pages consistent from the start. A small set of models can follow once the first one is working and the brand knows which other customers it needs to show.
Generate Candidates, Then Choose
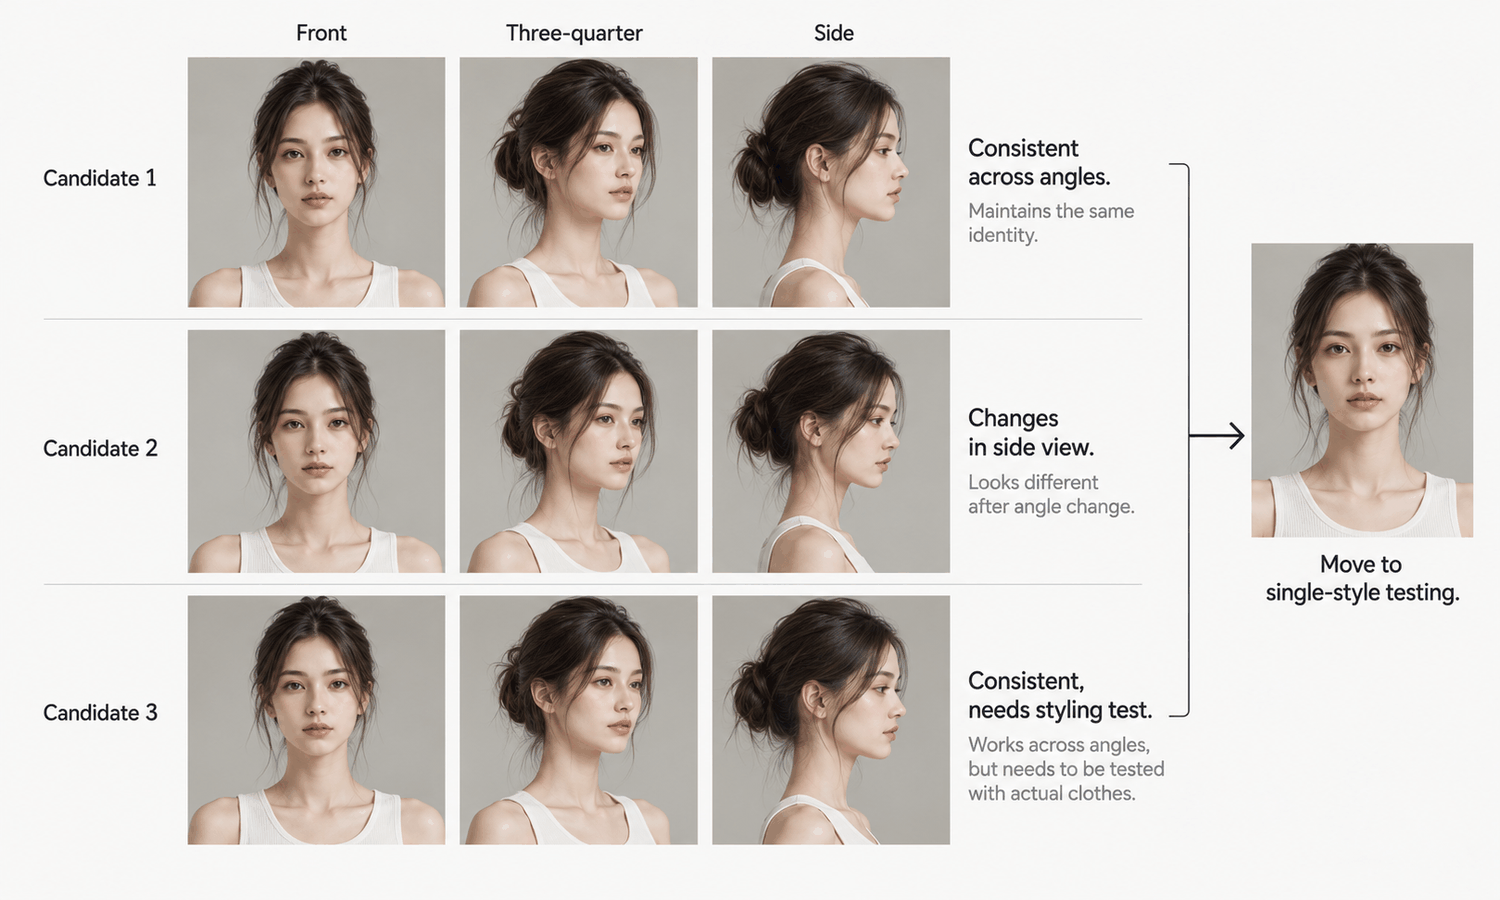
Do not generate one model and accept it. Generate several candidates from the same brief, lay them side by side and choose.
A shortlist is easier to judge than a single image, because differences become visible when candidates sit next to each other. Use a few clear criteria.
-
Does the candidate read as your customer? Look at the candidate the way a shopper would and ask whether it matches the brief and the line.
-
Does the person hold up across angles? Generate a three-quarter and a side view of each shortlisted candidate. A face that changes noticeably when the head turns will cause problems across a product's image set.
-
Does the candidate work with your garments? A model whose pose, proportions or styling pulls attention away from the clothes will make every product harder to see.
-
Does the face resemble a real person? Look at each face as a stranger would, and set aside any candidate that closely resembles someone real and identifiable.
-
Does the candidate fit the brand's look? Lighting, expression and general feel should sit comfortably with the rest of the brand's imagery.
Narrow the shortlist to two or three, and take those into the test.
Test the Model on One Style
A model that looks right on its own still has to wear your clothes. Choose one real style from the line, ideally one with typical selling details such as a printed logo, a distinctive collar or visible hardware, and use its flat-lay or garment photo as the source.
Put the garment on each shortlisted model and produce the full set of images you would publish: front, back, side and detail views. Then check three things.
First, check the garment against its source, in every image, without exception. Logos, printed text, stitching, trims, hardware and print placement should match the garment. Reconstructed detail tends to come back almost right, and almost right passes a quick look, so compare every image rather than a sample.
Second, check that the model is the same person across the set. Lay the images side by side at the same scale and look at the face, hair and hands together. Drift shows first when the angle changes.
Third, check where the garment meets the body: shoulders, neckline, waist, cuffs and anywhere a hand touches the fabric. Those are the points where generated imagery most often goes wrong, and where a small error changes how the garment reads.
Choose the test style carefully. Complex prints, lace and openwork, sheer fabrics and layered styling are current weak areas for generated imagery, so a test on one of those styles tells you more about the style than about the model. Test on a typical garment first, and plan photography for the harder styles.
Sometimes no candidate passes. That is a useful result, not a failure. Look at what went wrong. If the garment details drifted on every candidate, the problem is more likely the garment source than the model: retake the flat-lay pressed, evenly lit and with every detail visible, and test again. If the face changed across angles, go back to the shortlist and generate side views before choosing. If the model simply did not suit the clothes, revisit the brief. Each of these is cheaper to fix now than after the model has been used across a season.
Approve and Record
When one candidate passes the test, make the decision formal. It sounds like paperwork for a small brand, but it takes a few minutes and saves hours later.
Record the brief and any reference images, so the model can be recreated or extended into new poses and scenes. Record the likeness check with its date. Record who approved the model and when. Note which line and categories the model is assigned to. Decide how the brand will label AI-generated imagery in the markets and channels it sells in, and record that too.
Keep one rule from the start: a generated model did not wear the garment in any size, so product pages should not carry a caption such as "model wears size S." Size guidance comes from the size chart and measurements.
Then save the model so the whole team, and any outside producer, works from the same person. From here, every new style in the line is placed on the approved model, in the approved pose and scene, and checked against its garment source.
Extend the model gradually. Add the next few styles from the same line before moving to other categories, and review each batch as a set as well as image by image, so that drift in the model or in the garments shows up early. When the brand is ready for a second model, repeat the same five steps rather than improvising: a written brief, a shortlist, a test on one real style and a recorded approval. The process that produced the first model is what keeps the second and third consistent with it.
Making Your First Model in Practice
In Lightchain AI (apparel AI), the five steps map onto a few tools.
-
Model Studio creates candidates and adjusts face, body, size, pose, scene and angle, which is also how the three-quarter and side views of each candidate are produced.
-
AI Virtual Try-On puts the test style on each shortlisted model from its flat-lay, and saved model sets keep every later style on the approved model.
-
Personal and enterprise libraries give the team a shared place for the approved model and its garment sources, and an AI Compliance Mark watermark control is available where the brand's labeling decision calls for it.
For brands moving from a first model to on-model imagery across a whole line, Scale E-commerce is the Lightchain AI solution built for that work.
Frequently Asked Questions
How do you make a model for a fashion brand?
Decide who the model is for, write a neutral brief, generate several candidates and choose, test the shortlist on one real style, then approve, record and save the model. Every later style is placed on that approved model.
Why generate several candidates instead of one?
Because differences only become visible side by side. A shortlist lets you compare how each candidate reads as your customer, holds up across angles and works with your garments.
Which style should be used for the test?
A typical style from the line with visible selling details, such as a logo, a distinctive collar or hardware. Avoid complex prints, lace, sheer fabrics and layered styling for the first test, since those are current weak areas for generated imagery.
What should be recorded when the model is approved?
The brief and references, the likeness check and its date, who approved the model and when, the lines it is assigned to and the brand's labeling decision. Those records let the team recreate the model and answer questions later.
Should a brand start with one model or several?
One is usually enough for a first line, because it keeps the test simple and the product pages consistent. Add models once the first one is working and the brand knows which other customers it needs to show.
Can product pages say which size the model wears?
Not for a generated model, which did not wear the garment in any size. Give size guidance through the size chart and measurements.
How does Lightchain AI help a brand make its first model?
Model Studio creates and adjusts the candidates, AI Virtual Try-On tests them on a real style from its flat-lay, and saved model sets and shared libraries keep the approved model in use across the line. Scale E-commerce is the solution to use once the first model is ready to carry a full range.
In Closing
Making a brand's first AI model is less about generating a face and more about making a deliberate choice. Start from the line and its customers, write a neutral brief, generate several candidates and choose side by side. Test the shortlist on one real style, checking the garment, the identity and the contact points in every image. Then approve, record and save the model, so every style that follows starts from the same person.
Start Here
If your brand is ready to make its first AI model and use it across a line, Scale E-commerce is the solution to use. It is built for producing on-model imagery across many styles: you create and choose your model, test it on a real garment from its flat-lay and keep it in saved model sets for every style that follows. Start with one line and one test style, and extend once the model holds up.
**Explore Scale E-commerce → **https://www.lightchainai.com/global/solutions/scaleECommerce