
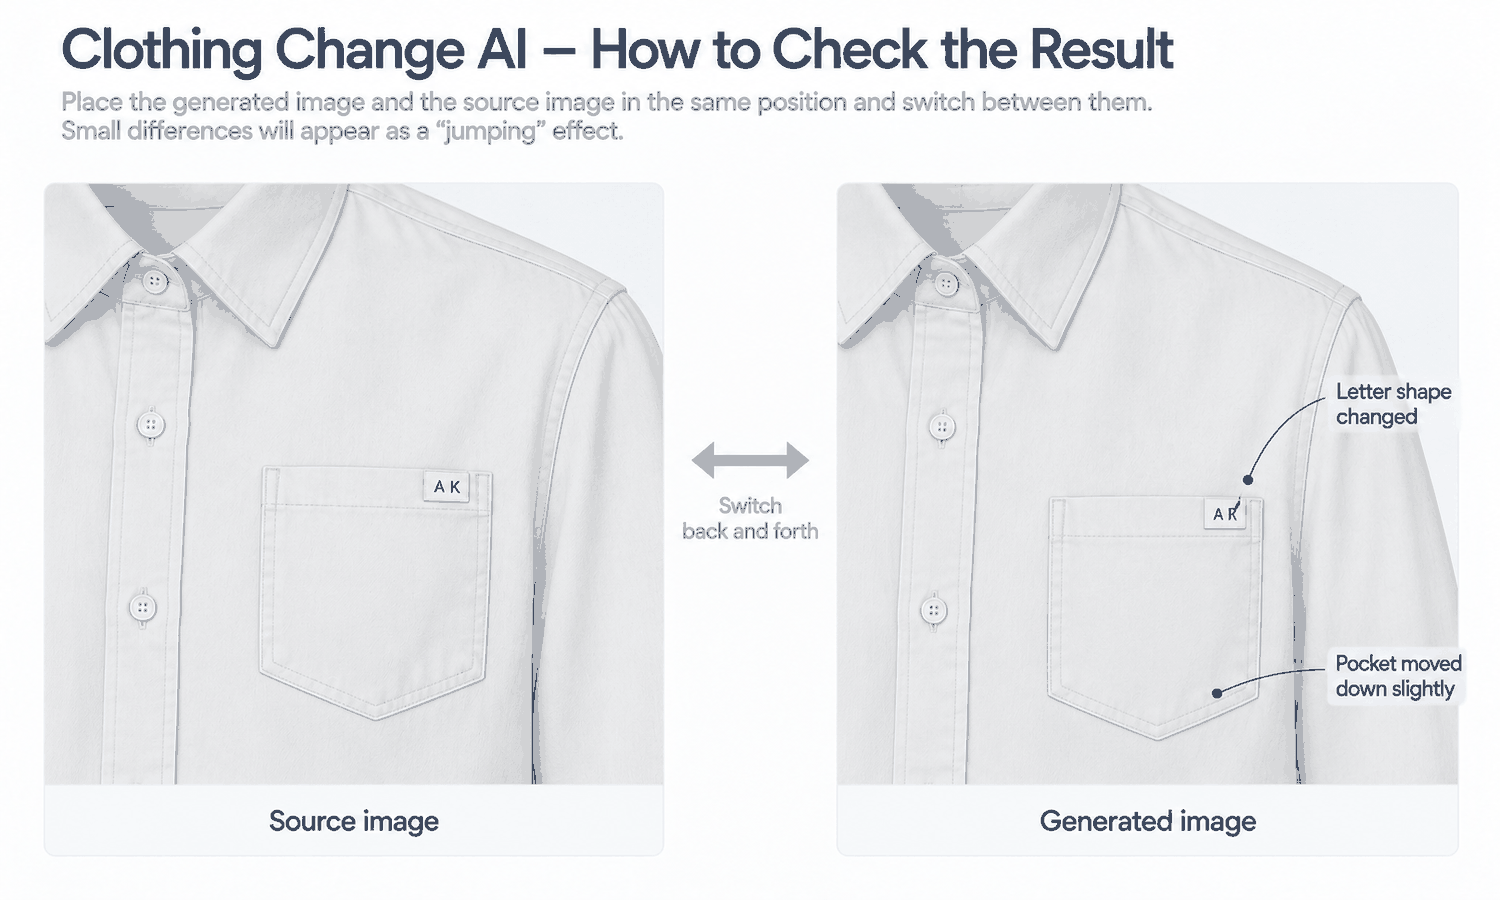
Clothing change AI produces images quickly, and every one of them needs checking before it is used. The garment is reconstructed on the model rather than photographed there, and reconstructed detail tends to come back almost right: a logo slightly reshaped, a button with the wrong number of holes, a collar a little different from the real one. Almost right is exactly what a quick look approves. The only reliable defense is a careful comparison with the garment source, done the same way every time.
Most advice says to check every image against its source. Very little explains how. Looking at an image and a flat-lay one after the other, from memory, misses small differences. Looking at them side by side is better. Flicking between them in the same position is better still, because differences jump out. And a fixed order of areas to check keeps attention from drifting to whatever is most eye-catching.
This article explains why checking needs a method, the three ways to compare an image with its source, the order in which to check a garment, how to check a batch and how to record what you find.
| Method | How it works | What it catches well | What it misses |
|---|---|---|---|
| Side by side | Image and source shown next to each other at the same scale | Overall shape, color relationships, missing details | Small shifts that need precise alignment |
| Toggle | Image and source shown in the same position, switching back and forth | Small differences in position, shape and lettering | Differences in areas the pose has moved |
| Zoom by area | Each area viewed at full size, one at a time | Fine details: text, trims, stitching, texture | The garment as a whole |
Why Checking Needs a Method
Checking by impression fails in predictable ways. The eye goes first to the face, the pose and the overall look, which are usually fine, and forms a favorable judgment before it reaches the small details where errors live. Once an image looks good, a reviewer is inclined to approve it.
Fatigue compounds the problem. The twentieth image in a batch gets less attention than the first, and errors that repeat across a batch, because images made the same way tend to share the same mistake, can be approved twenty times over.
A method solves both. It fixes what to compare, how to compare it and in what order, so each image gets the same attention regardless of how appealing it looks or where it falls in the batch. It also makes checking faster, because the reviewer is not deciding what to look at each time.
Three Ways to Compare an Image With Its Source
The three methods are most useful in combination, each catching what the others miss.
Side by side is the starting point. Place the generated image and the garment source next to each other at the same scale, with the garment roughly the same size in both. This shows whether the overall shape is right, whether any detail is missing or added and whether colors relate to each other the same way. It is quick and good at catching large problems.
Toggling is the sharpest tool for small differences. Place the image and the source in exactly the same position and switch between them, so one replaces the other on the screen. Differences in the position of a pocket, the shape of a collar or the letters of a logo appear as movement, which the eye notices immediately. Toggling is most effective on areas the pose has not moved much, such as the chest of a garment in a front-facing pose.
Zooming by area covers fine detail. View each area of the garment at full size, one at a time, and compare it with the matching close-up of the real garment. Printed text, trims, stitching and fabric texture are often invisible at normal viewing size and obvious at full resolution.
A practical tip for toggling: when the pose has turned or bent the garment, toggle against an earlier approved image of the same garment in a similar pose rather than against the flat-lay. That keeps the positions close enough for small differences to show, while the flat-lay remains the reference for what the garment itself should look like.
None of these requires special software. Two windows side by side, an image viewer that can switch between two files and the ability to zoom are enough.
Checking a Garment in a Fixed Order
A fixed order ensures nothing is skipped. The same order works for most garments.
-
Outline and construction. The overall silhouette, the seams, the panels and the length compared with the source.
-
Closures and pockets. Buttons, zips, snaps and pockets: their number, position, size and shape.
-
Logos, labels and printed text. Every letter read against the artwork or close-up.
-
Trims and hardware. Buckles, rivets, eyelets, zipper pulls and any decorative trim.
-
Prints and patterns. Placement, scale, direction and how the pattern meets itself at seams.
-
Contact points. Where the garment meets the body: shoulders, neckline, waist, cuffs, hem and anywhere a hand touches the fabric.
-
Edges and boundaries. The neckline, cuffs and hem for leftovers of any previous garment, and hair or hands that have merged into the fabric.
-
Color. Last, and against the physical sample rather than the screen, since screen color is not a physical reference.
Working from the outside in and from large to small means structural problems are caught before time is spent on details that may need regenerating anyway.
How to Check a Clothing Change AI Batch
Batches need a slightly different approach, because their errors tend to repeat.
Check the first few images of a batch thoroughly before producing the rest. If they share an error, such as the same misplaced pocket or the same leftover collar, the cause is probably in the garment source or the settings, and it is far cheaper to fix it there than image by image.
Then check every image, without exception. A clean first few does not mean a clean batch; it means the most common error has been ruled out. Individual images can still go wrong in their own ways.
Keep batches to a size a reviewer can finish with full attention, and vary the order occasionally so the same images are not always reviewed last, when attention is lowest. Where two people are available, have one produce and the other check, so every image is seen with fresh eyes.
Some garments need more time in every batch. Complex prints, lace and openwork, sheer fabrics and layered styling remain current weak areas for generated imagery, and they reward the zoom step most. When a style in those categories keeps failing the check, route it to photography rather than regenerating it indefinitely.
Recording What You Find
A check is only useful if its results are kept. For each image, record whether it passed, and if not, what was wrong, where and compared with which reference. A short line is enough: image number, area, problem, reference. Keep the record next to the images, in the same folder or sheet, so anyone picking up the batch later can see at a glance what was checked and what changed.
That record does three things. It turns a problem into a clear note for whoever fixes it, which prevents a second round of corrections. It shows patterns across batches, such as a trim that always comes back wrong or a category that always struggles, which point to upstream fixes. And it gives the brand an answer when a question comes up later about how an image was checked.
In Lightchain AI (apparel AI), a check that finds a problem leads to a matching fix.
-
A problem in a defined area, such as a trim, a pocket or a boundary, can be corrected locally with Target Revision using a reference image, as described on the Partial Redraw page.
-
A problem across the whole garment is usually quicker to fix at the source: AI Virtual Try-On places the garment on the model again from a clean flat-lay.
For teams checking and correcting generated images before they are published, Partial Redraw is the Lightchain AI solution built for precise, local fixes.
Frequently Asked Questions
How should clothing change AI results be checked?
Compare every image with its garment source using three methods: side by side for overall shape, toggling for small differences in position and lettering and zooming by area for fine details. Check areas in a fixed order, from outline to color.
What is toggling?
Placing the generated image and the garment source in the same position on screen and switching between them. Differences appear as movement, which makes small shifts in shape or lettering easy to spot.
In what order should a garment be checked?
Outline and construction, then closures and pockets, logos and text, trims and hardware, prints and patterns, contact points, edges and boundaries, and finally color against the physical sample. Working from large to small catches structural problems before time is spent on details.
Is checking a sample of a batch enough?
No. Check the first few images thoroughly to catch shared errors, then check every image, because individual images can still fail in their own ways.
What should be recorded after checking?
For each image, whether it passed, and if not, the area, the problem and the reference it was compared with. A short line per image is enough.
When should a style be photographed instead?
When it keeps failing the check, especially styles with complex prints, lace, sheer fabrics or layering. Photography is quicker than regenerating indefinitely.
How does Lightchain AI help after a check finds a problem?
A problem in a defined area can be corrected locally with Target Revision using a reference image, and a problem across the whole garment can be fixed by placing it again from a clean flat-lay with AI Virtual Try-On. Partial Redraw is the solution to use for those local fixes.
In Closing
Clothing change AI results need checking, and checking needs a method. Compare every image with its garment source side by side, by toggling and by zooming into each area. Work through the garment in a fixed order from outline to color, check the first images of a batch thoroughly before producing the rest and then check every image. Record what you find, fix problems at the source when they repeat and photograph styles that keep failing.
Start Here
If your team checks generated images before publishing and wants problems fixed without regenerating everything, Partial Redraw is the solution to use. It is built for precise, local refinement: you correct a trim, a pocket or a boundary in a defined area using a reference image, and the rest of the image stays as it was. Start by checking your next batch with the order above, and fix what you find locally.
**Explore Partial Redraw → **https://www.lightchainai.com/global/solutions/partialRedraw