
Somebody searching for a clothes swap ai free option is usually doing one sensible thing: trying to find out whether this works on their product before committing anybody's budget to it. That instinct is right. What goes wrong is almost never the cost of the evaluation. It is the design of it.
The common failure runs like this. A team picks a style, uploads it, gets a result that looks good, and concludes the workflow works. Two months later the categories that actually matter to the business turn out to behave differently, and nobody can say when that could have been known. It could have been known in the first hour, from the same single test, run against a different style.
So the question worth answering is not where to try this at no cost. It is which one style to try it on, and what to look at when the result comes back.
What a single-style evaluation can and cannot tell you
| The question | Can one no-cost run answer it | What answering it actually takes |
|---|---|---|
| Does it handle this garment type at all | Yes, and this is the question a single run is genuinely good at | One prepared input and an honest look at the result |
| Will it be consistent across a set | No. A single output has nothing to be consistent with | The same input run three times, unchanged, and compared |
| Are the details right | Only if you compare against the source rather than judging the image on its own | A side-by-side comparison, every time, with the source open |
| What will this cost us per usable image | No, since one run says nothing about how many attempts an accepted output takes | Several styles across the categories you actually sell |
| Should we roll this out | No, and a single good result is the most common reason teams answer yes too early | One test per category that matters, plus somebody named to own review |
The pattern across the table is that a single output answers questions about that output, and almost every question worth asking is about a set. That is not an argument for a bigger test. It is an argument for building repetition into the small one, which costs almost nothing and changes what the test is capable of showing.
Pick the style you would most like to be wrong about
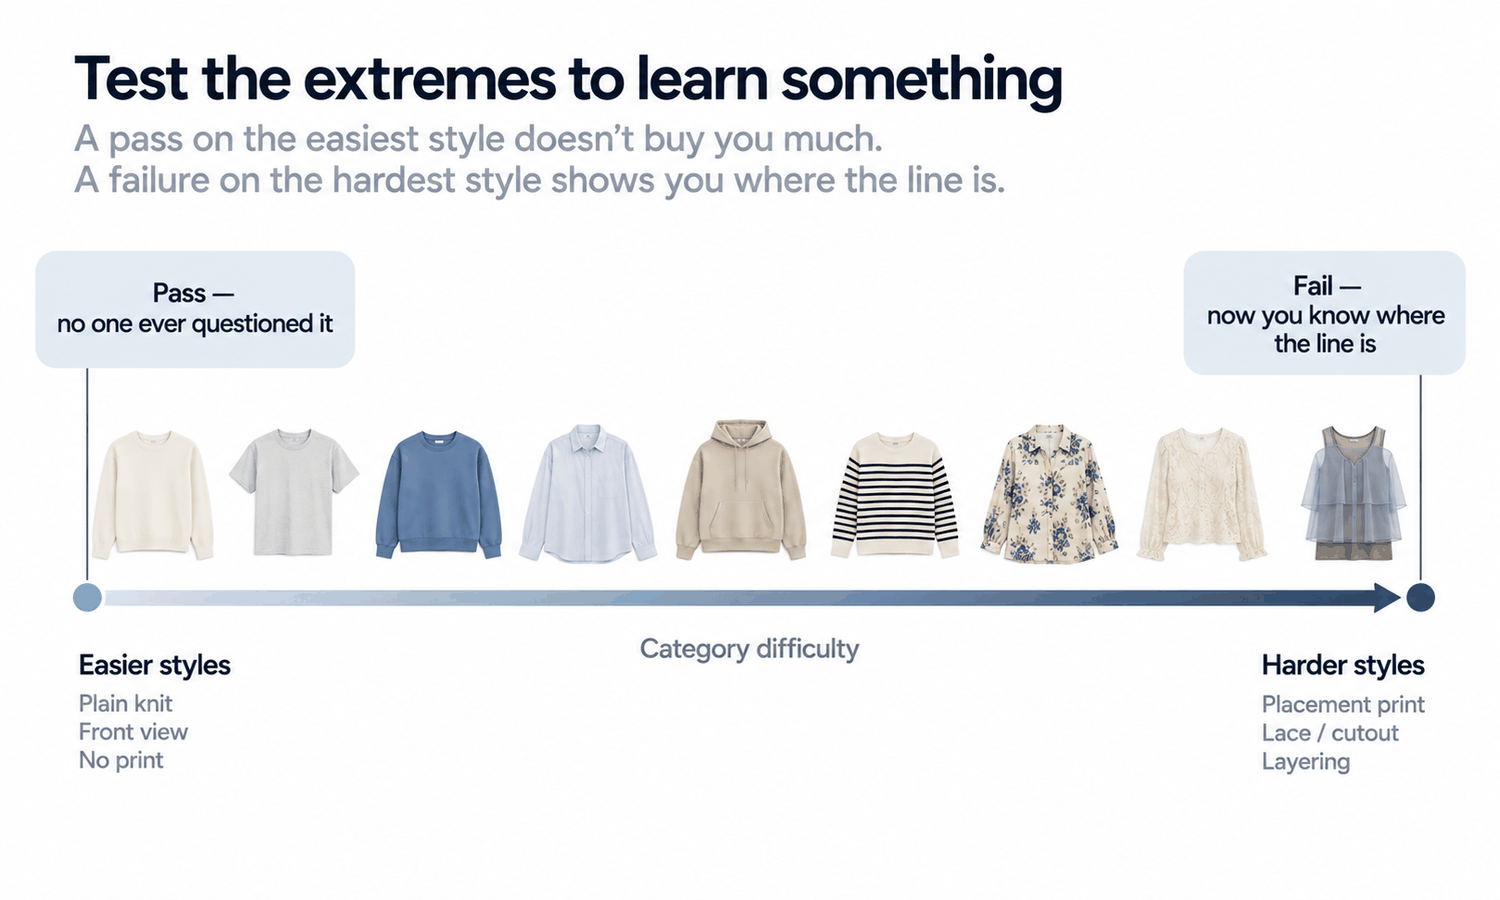
The instinct is to test on something clean: a plain jersey body, front-facing, good photograph, no print. It will come back well, and it will tell you nothing, because nobody doubted it.
Choose instead the style that would make the rollout fail. If the business runs on placement prints, test a placement print. If most of the range is sheer or has lace panels, test one of those, and expect a poor result, since open work and transparency are documented weak spots. If everything sells as a layered look, build a layered look and watch what happens where the garments cross, because overlaps are where the model has least information and does most inventing.
A test that passes on your easiest style has bought you nothing. A test that fails on your hardest one has told you exactly where the boundary sits in your own catalog, which is the only version of that information that matters. The one style to spend the effort on is the one you would most like to be wrong about.
Prepare the input, or you will be testing your own photography
Feed in an inconsistent, badly lit, partially obscured source photograph and the result will be poor. That is a true finding about that photograph and a useless finding about the workflow.
Shoot the test piece properly: one position, one distance, one plain background, even light, garment complete and unobstructed, hardware and printed detail captured close enough to be checked afterwards. It takes fifteen minutes and it is the difference between an evaluation and an anecdote. This is also a preview of the real commitment, since every image in a production workflow is a derivation from a capture like this one, and inconsistency entering there cannot be corrected downstream.
Run the same prepared input through on-model generation three times in AI Virtual Try-On, without changing anything between runs. Three runs cost very little and convert a single sample into the one thing a single sample cannot otherwise give you, which is a view of how stable the result is.
The five checks to run on that one style
Look at the outputs in this order, because the order stops a good overall impression from ending the review early.
-
Detail against source: compare logos, printed text, care labels, and small hardware against the source image, on every output, without exception. Reconstructed detail lands almost right — a letterform slightly off, a stitch count wrong, a zipper pull the wrong shape — and almost right is what survives an appreciative look and fails in front of a customer
-
Print position and repeat: whether the motif sits where it should relative to center front and the seams, and whether the pattern stays continuous across panels. Scale is the one that turns into money later, since a repeat is a measurement and an image only ever shows a ratio
-
Stability across the three runs: whether the fall, the volume, and the details stay the same. A style that comes back different each time is one where a single output should not be carrying a decision
-
Behavior at the boundaries: if anything is layered, look specifically at the lines where one garment crosses another, since nothing there belongs to a single piece and it is the first place review skips
-
Whether one failing region is isolated: when the rest of the frame is sound, a targeted correction to that region is a smaller job than a rerun — the region is rebuilt against the source in Partial Redraw while everything else is left alone, and knowing that changes how you read a partial failure
In Lightchain AI (apparel AI) the uploaded source stays beside the outputs it produced, which makes the first two checks a comparison rather than a hunt through folders. That matters more in a real workflow than in a test, but it is worth noticing during one, because the administrative side of this is where teams lose time later.
What the test cannot settle
The output is a visual asset. It does not predict fit, determine sizing, model how a fabric behaves in motion, or forecast returns. Those come from measurements, a graded pattern, a physical sample, and your own data. No test design reaches any of them, and a result that looks convincing is not evidence about the garment on a body.
Color is the one people try to evaluate anyway. Screen color is not a physical reference, exact code matching is not something to promise, and the gap between a monitor and a roll of cloth stays open regardless of display quality. Colorways get settled by strike-offs against an agreed standard, so a test cannot score color and should not try. Judging a colorway direction is a separate activity with a separate resolution path.
Two scope questions are worth settling before designing anything. Footwear is not covered by this workflow, so a footwear test has nothing to measure. And there is no physical simulation here — nothing builds geometry or predicts material behavior, so the drape in an output is rendered rather than computed and says nothing about the cloth. Existing 3D assets can be converted into flat garment images that then enter the workflow as inputs, which is a different thing from the workflow producing or simulating 3D.
Reading the result without over-reading it
One style tells you about that style and about the category it belongs to. It does not tell you about the workflow in general, and the temptation to generalize in either direction is strong once somebody has spent an afternoon on it.
Write the finding as a sentence about a category. Placement prints came back with the motif consistently low. Layered looks lost the hem line behind the jacket in two of three runs. Plain bodies were stable. That kind of statement survives being repeated to somebody who was not there, and a verdict like it works or it does not does not survive contact with the second category.
-
Record the source photograph, the settings, and all three outputs together, since a finding without its inputs cannot be rerun later
-
Test the next category separately rather than assuming the result transfers, because the categories fail for different reasons
-
Decide before extending whether anyone will own the comparison check in production, as that is the constraint volume lands on
-
Check current published terms before committing to a plan: the platform lists credit packages starting at $9.90 for 600 credits, described by the company as roughly 20 images, and whatever trial or entry terms apply should be read from the current listing rather than assumed
That last figure is a list price and not your cost per usable image, which depends on how many attempts each accepted output takes in your categories. The test you just ran is the only thing that gives you a sense of that number, and it is the most useful thing it produces. Whether the work eventually runs through Lightchain AI or a camera, deciding colorway and fabric direction faster is worth something only in the categories where the output was stable enough to trust.
Frequently asked questions
Is one style really enough?
One style is enough to establish where a boundary sits for that category, which is the thing worth knowing first. It is not enough to plan a rollout, and treating it that way is how teams get surprised in the second category. Test one style per category that matters, rather than several styles from the same easy category.
Why three runs rather than one?
Because a single output cannot show variation, and variation is what breaks sets in production. Three identical runs cost very little and reveal whether the workflow is confident in that category. A style that returns something different each time needs a different plan from one that returns the same thing reliably.
We got a poor result. Was it the input or the workflow?
Check the source photograph first against the preparation described above, since most poor first results come from an obscured, uneven, or partial capture. Reshoot to a proper standard and rerun before drawing any conclusion. If the second attempt fails the same way, the finding is about the category.
Should we compare more than one tool?
For an internal decision, yes, provided the garment, the source photograph, the preparation, and the reviewer are identical on both sides. Keep the result internal, since a comparison worth publishing needs a stated method and a defined evaluation set. An informal run does not meet that bar.
What should we do with a category that clearly fails?
Route it to conventional photography and write down the reason next to the category, then set a retest to a product update rather than to a date. A failed category is information about where the line sits. Retesting the same setup on a schedule produces the same answer at a cost.
Who should look at the outputs?
Whoever would approve images in production, not whoever is curious about the tool. The checks are comparisons against a source rather than aesthetic judgments, so they need somebody who knows the product well enough to notice a wrong stitch count. An enthusiastic reviewer produces an optimistic evaluation.
In closing
The cost of an evaluation is not what makes it useful. Choosing the style you would most like to be wrong about is what makes it useful, followed by preparing the input so the test measures the workflow rather than your photography, and running it three times so a single output becomes a small view of consistency. Then check the details against the source, look hard at the boundaries, and write the finding as a sentence about a category rather than a verdict about a tool. That test costs an afternoon and answers the question the budget conversation will actually turn on.
Start here
Choose the style now, before reading anything else about the tooling, and choose it by asking which category would sink the rollout if it did not work. Photograph it properly, run it three times unchanged, and look at the details before you look at the overall impression. Write one sentence about the category when you are done, and keep the source photograph and all three outputs together so the run can be repeated later. If that sentence is uncomfortable, the test worked.
**Start with the on-model workflow → **https://www.lightchainai.com/global/solutions/aiVirtualTryOn