
Change clothing in photo tools replace the garment a person is wearing in an existing image with a different one, while the person, the pose and the setting stay in place. For apparel teams, it is a way to reuse good photographs: one strong image of a model can show several garments, and a new season's pieces can appear in a setting that already works. The result can look as if the model had simply changed clothes between shots.
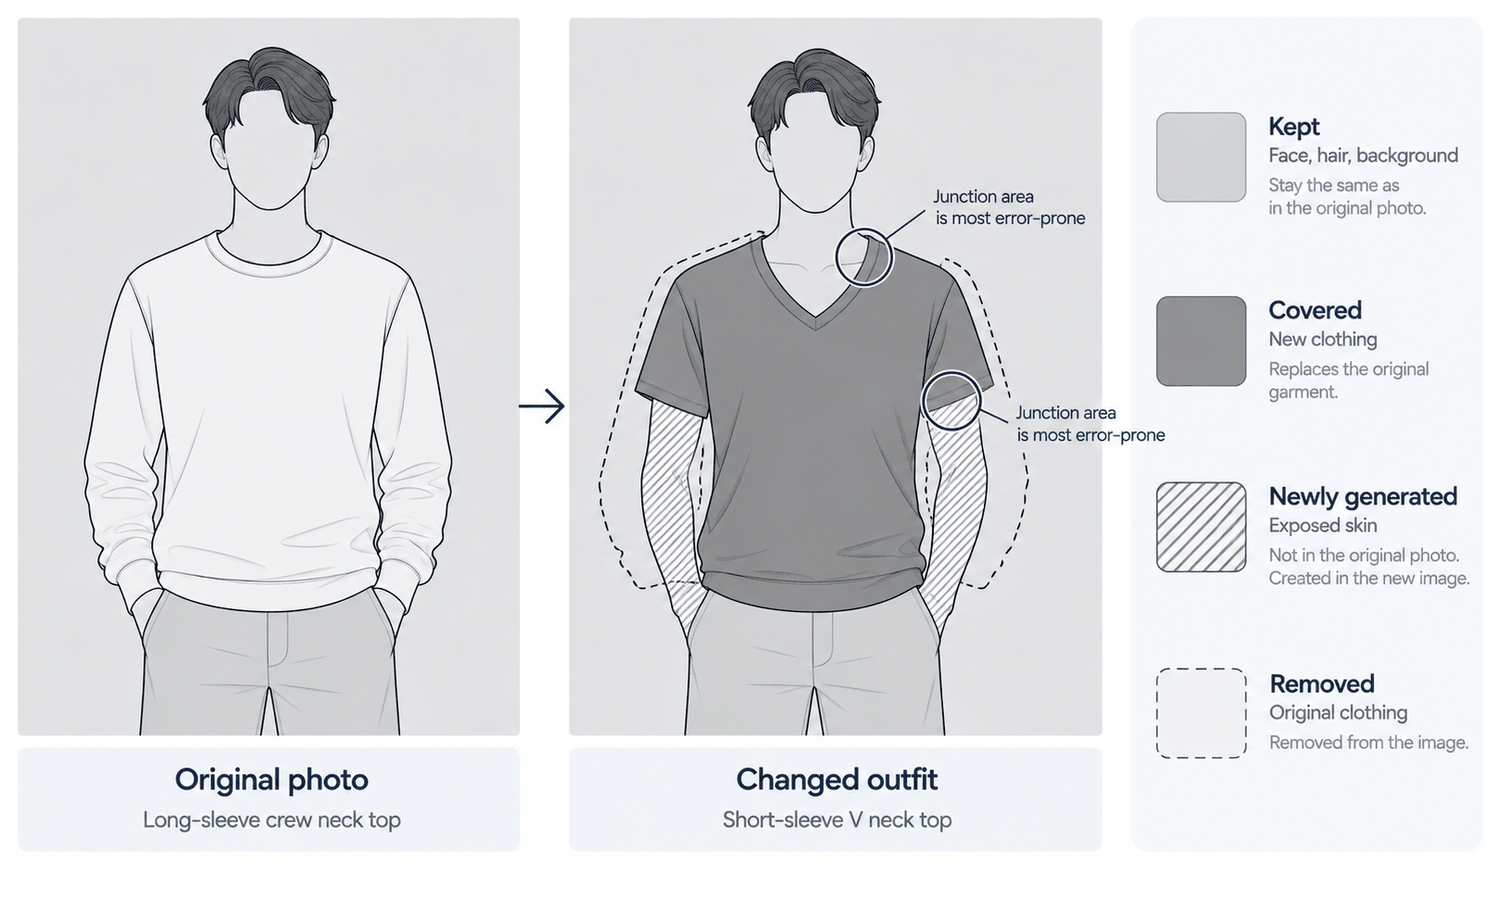
What happens inside the image is more involved than a change of clothes. The photo is effectively divided into regions, and each region is handled differently. Some parts are kept as they were. Some are covered by the new garment. Some have to be created from nothing, because they were never visible in the original photo. And some parts of the old garment have to disappear completely. Most of what goes right or wrong in a clothing change can be explained by which region a detail falls in.
This article explains the four kinds of region, what is kept and what is covered, what has to be created, what must disappear and how the regions meet, and how to change clothing in a photo reliably in practice.
| Region | What happens | Typical problem | What to check |
|---|---|---|---|
| Kept | Face, hair, background and untouched areas stay as they were | Slight shifts where the kept area meets the change | Edges near the neckline, hands and hair |
| Covered | The new garment is placed where the old one was | Garment details reconstructed almost right | Logos, text, trims and construction against the source |
| Created | Newly exposed skin and background beyond a new outline are generated | Skin tone, anatomy or light that does not match | Continuity with the kept areas |
| Removed | Parts of the old garment must vanish | Leftover collar points, cuffs or hems | Every edge where the old garment reached |
Four Kinds of Region in One Photo
The simplest way to understand a clothing change is to picture the original photo and the new garment laid over each other.
Where the new garment sits over the old one, the image is covered: the old garment's pixels are replaced with the new garment's, reconstructed from its source photo and shaped to the body and pose.
Where neither garment reaches, the image is kept: the face, the hair, the background and any part of the body the clothing never touched remain essentially as they were.
Where the old garment reached but the new one does not, something has to be created. If the new garment is shorter, lower cut or sleeveless, the skin and body underneath were never in the photo, so they are generated. If the new garment is narrower, the background behind the old garment's outline has to be generated too.
Where the old garment reached and the image now shows something else, the old garment must disappear entirely. Any fragment left behind, such as a collar point or the edge of a cuff, gives the change away.
Every clothing change contains some of each. The balance between them depends almost entirely on how similar the two garments are.
What Change Clothing in Photo Tools Keep and Cover
The kept region is the easiest. It carries through from the original photo, which is why the model's face, hair and setting usually look unchanged. The places to watch are its edges, where the kept area meets the change. Hair over a collar, a hand resting on the garment and the skin at a neckline all sit on that boundary and can shift slightly.
The covered region is where the product lives, and it deserves the most attention. The new garment is not photographed onto the model. It is reconstructed from its source image and fitted to the existing body and pose. Details the source showed clearly can come through faithfully. Details the source showed poorly, or that the pose hides or bends, are filled in, and filled-in detail tends to come back almost right: a logo slightly reshaped, a trim a little different, a pocket moved. Check every image against the garment source, without exception, and view it at full size.
The pose matters here as well. The garment has to follow a pose that was chosen for a different garment. A stance that suited a fitted jacket may crease a loose shirt in unusual ways, and a hand that rested naturally on one waistband may look awkward on another.
What Is Created: Skin, Body and Background
The created region is the one most people do not think about, and it causes some of the most noticeable errors.
A clothing change creates new areas whenever the new garment covers less than the old one.
-
Shorter sleeves. Swapping a long-sleeved top for a short-sleeved one means the forearms or upper arms must be generated.
-
Lower or wider necklines. Replacing a crew neck with a V-neck or a scoop neck means the neck and upper chest must be generated.
-
Shorter hems. Replacing trousers with shorts, or a long skirt with a short one, means the legs must be generated.
-
Narrower silhouettes. Replacing a wide coat with a slim jacket means the background behind the coat's outline must be generated.
Each created area has to agree with what was kept. Generated skin must match the tone of the face and hands under the same light. Generated arms and legs must have plausible anatomy and proportions consistent with the rest of the body. Generated background must continue the real background without a visible seam. None of this was in the original photo, so it is entirely produced, and it should be checked as carefully as the garment.
When the original photo shows a real, identifiable person, the created region raises one more question. Generating parts of a real person's body that were never photographed produces an image of them that did not exist. Whether that falls within the model's agreement and the brand's usage rights is a question for whoever manages those agreements, and it should be settled before any such change is made.
What Must Disappear, and Where the Regions Meet
The removed region is the mirror image of the created one. It appears whenever the new garment covers less than the old one or has a different shape: the old garment's collar, cuffs, hem or straps must vanish completely, replaced by skin or background.
Leftovers are a common giveaway. A sliver of an old collar under a new neckline, a cuff peeking out below a shorter sleeve or the line of an old hem across the legs all reveal that the image was altered. They are easy to miss at thumbnail size and obvious at full size.
Most errors in a clothing change cluster where the four regions meet: the neckline, where kept skin, the new garment, created skin and the removed old collar can all meet; the cuffs and hems; and anywhere hair or hands overlap the garment. Checking those boundaries at full size, in every image, catches most problems before they reach a product page.
Changing Clothing in a Photo in Practice
The single most useful principle is to swap like for like. When the new garment covers roughly the same area as the old one, such as a long-sleeved top for another long-sleeved top or a knee-length skirt for another knee-length skirt, there is little to create and little to remove, and the result depends mainly on the garment itself. The further the coverage changes, the more of the image has to be invented.
That principle turns into a simple way of working. Keep a small set of base photos grouped by coverage: one for long sleeves, one for short sleeves, one for sleeveless, one for long bottoms, one for short. Change garments within each group, and batch the work by group. Review each batch with the created and removed regions in mind, because in a batch made from the same base photo, the same boundary problem tends to repeat across every image. Some garments are harder to place in any photo: complex prints, lace and openwork, sheer fabrics and layered styling remain current weak areas for generated imagery.
In Lightchain AI (apparel AI), garment changes run from the garment source.
-
AI Virtual Try-On places a garment on a model from its flat-lay or garment photo, including on a saved model set, so each coverage group can use the same approved model.
-
For smaller changes in a defined area, Target Revision replaces an element using a reference image, as described on the Partial Redraw page.
-
The Image Editor's eraser and local editing tools help remove leftover fragments of an old garment at the boundaries.
For teams changing garments across many styles, AI Virtual Try-On is the Lightchain AI solution built around starting from the garment.
Frequently Asked Questions
What does a change clothing in photo tool actually do?
It replaces the garment in an existing image while keeping the person, pose and setting. Inside the image, some regions are kept, some are covered by the new garment, some are created and some parts of the old garment are removed.
Why do sleeves and necklines cause problems?
Because when the new garment covers less, the arms, neck or chest underneath must be generated. Those created areas have to match the kept skin, anatomy and light.
What is a like-for-like swap?
Replacing a garment with one that covers roughly the same area, such as long sleeve for long sleeve. There is little to create or remove, so the result depends mainly on the garment itself.
Where do most errors appear?
Where the regions meet: necklines, cuffs, hems and anywhere hair or hands overlap the garment. Leftover pieces of the old garment and mismatched skin tone are the most common giveaways.
Can clothing be changed in photos of real models?
Only after confirming that the model's agreement and the brand's usage rights cover it, especially when the change reveals body areas that were never photographed. Settle that before making the change.
How should a batch of clothing changes be organized?
Group base photos by coverage, change garments within each group and review each batch with the created and removed regions in mind. Problems from one base photo tend to repeat across the batch.
How does Lightchain AI support changing clothing in a photo?
AI Virtual Try-On places each garment on an approved model from its flat-lay, and smaller changes can be made in a defined area with a reference image. AI Virtual Try-On is the solution to use for changing garments across many styles.
In Closing
Change clothing in photo work divides the image into what is kept, what is covered by the new garment, what has to be created and what must disappear. The covered region holds the product and needs checking against its source. The created region, meaning new skin, body and background, needs checking against what was kept. The removed region needs checking for leftovers. Swap like for like wherever possible, group base photos by coverage, check the boundaries at full size and settle the rights before changing clothing on a real person.
Start Here
If your team changes garments in on-model images and wants results that hold up at full size, AI Virtual Try-On is the solution to use. It is built around starting from the garment: you place each flat-lay on an approved model, keep coverage groups consistent and correct smaller areas locally. Start with one coverage group and a few garments, check the boundaries in every image at full size, and extend group by group once the results hold.
**Explore AI Virtual Try-On → **https://www.lightchainai.com/global/solutions/aiVirtualTryOn