
Choosing an AI model tool for apparel imagery usually starts with a search for a ranking: a list that says which tool is the one to use. Rankings are easy to read and hard to rely on. They are built from someone else's garments, someone else's categories and, often, the tool makers' own example images, which are chosen to show each tool at its most flattering. What matters for your brand is how a tool handles your products, your categories and your channels, and no ranking can tell you that.
The more useful answer is a method. With a small set of your own garments and a clear list of what to check, you can evaluate any AI model tool on the output that actually matters to you, and compare tools on equal terms. The same method also tells you whether a tool you already use is still the right one.
This article explains why rankings do not answer the question, how to build a test from your own products, what to evaluate in the images, what to evaluate beyond them and how to run the evaluation and decide.
| Criterion | What to test | What a pass looks like |
|---|---|---|
| Garment fidelity | Your own flat-lays, including detail-heavy styles | Logos, text, trims and prints match the garment |
| Identity consistency | One model across angles and several styles | The same person in every image |
| Control | Pose, scene, angle and model settings | Changes happen where requested and nowhere else |
| Contact points | Shoulders, waist, cuffs, hands on fabric | Construction reads correctly where garment meets body |
| Repeatability | The same garment and settings, run again | Results close enough to rely on |
| Inputs and workflow | What the tool needs and how it fits your process | Works from the garment photos you already take |
| Terms | Commercial use, uploads, ownership of outputs | Allows your intended use, in writing |
| Cost per accepted image | Everything it takes to reach a publishable image | Measured on your products, not estimated |
Why Rankings Don't Answer the Question
A ranking compares tools on what its author could see. That is usually a handful of garments, often simple ones, sometimes supplied by the tools themselves. A tool that renders plain tops beautifully may struggle with your printed dresses. A tool that excels at campaign images may be awkward for consistent product pages. A tool whose terms suit a hobbyist may not suit a brand selling across several markets.
The garment is the part of an on-model image that must match reality, and every brand's garments are different. Fabrics, trims, prints, logos and construction details vary enormously, and each tool reconstructs them with different strengths. The only reliable way to know how a tool handles your garments is to give it your garments.
There is a second reason to evaluate for yourself. Tools change often. A comparison written some months ago may describe versions that no longer exist. A test you run on your own products reflects the tool as it is today, and it can be repeated whenever you need to check again.
Building a Test From Your Own Products
A useful test is small and deliberately varied. Six to ten styles are usually enough to see a pattern.
-
Typical styles. A few garments that represent the bulk of your range, so the test reflects everyday work.
-
Detail-heavy styles. Garments with printed text, logos, distinctive trims or visible construction, since these reveal fidelity problems fastest.
-
Different categories. At least one top, one bottom and one dress or outerwear piece, if your range includes them, because tools handle categories differently.
-
One weak-area style. One garment with a complex print, lace, sheer fabric or layering, judged separately. It shows the limits, which are useful to know before you rely on a tool.
-
Garments you have physically. Every test garment should be in hand, so each image can be compared with the real thing.
Photograph each garment as a clean flat-lay, pressed and evenly lit, with close-ups of the details. Use the same flat-lays and the same brief for every tool you test, so differences in the results come from the tools, not the inputs. Write the brief down: the model's age range and build, described neutrally, the pose, the scene and the views you need.
What to Evaluate in the Output
Review every image at full size, against the garment in hand.
Garment fidelity comes first. Check construction, logos, printed text, trims, hardware and print placement. Read text letter by letter and compare logos with the artwork. Reconstructed detail tends to come back almost right, and almost right is the difference a customer notices when the parcel arrives. Record each difference and how serious it is.
Identity consistency comes next. Generate the same model in front, three-quarter and side views, and across several garments. Lay the images side by side and ask whether it is plainly the same person throughout. A model that drifts between images will make your product pages look inconsistent.
Then check the contact points: shoulders, necklines, waistbands, cuffs and anywhere a hand touches the garment. These are where construction most often shifts, and where a small shift changes how the garment reads.
Check control. Change one setting at a time, such as the pose or the scene, and see whether only that thing changes. A tool that alters the garment or the face when you asked only for a new background is harder to work with than its first image suggests.
Finally, check repeatability. Run the same garment and settings again. Results do not need to be identical, but they need to be close enough that a team can rely on them.
Keep the limits in view throughout. Screen color is not a physical reference, so judge color against the garment. The drape in any generated image is rendered, not calculated, and no tool's images show fit.
What to Evaluate Beyond the Images
A tool can produce good images and still be the wrong choice.
Read the current terms for the tier you would actually use. Check three things: whether outputs may be used commercially, how uploaded garment photos are stored and used, and who holds rights in what is produced. Record what you found and the date, because terms change.
Look at inputs and workflow. Does the tool work from the flat-lays you already capture, or does it need something your team does not produce? Does it keep approved models so they can be reused? Does it support the formats and channels you publish to? Can a team share models and garment sources?
Look at labeling. If your channels expect AI-generated imagery to be marked, check whether the tool helps you do that consistently.
And measure the cost per accepted image: every generation, correction and review it took to reach an image you would publish, divided by the images you would publish. Measure it on your test garments rather than estimating from a price page.
Running the Evaluation and Deciding
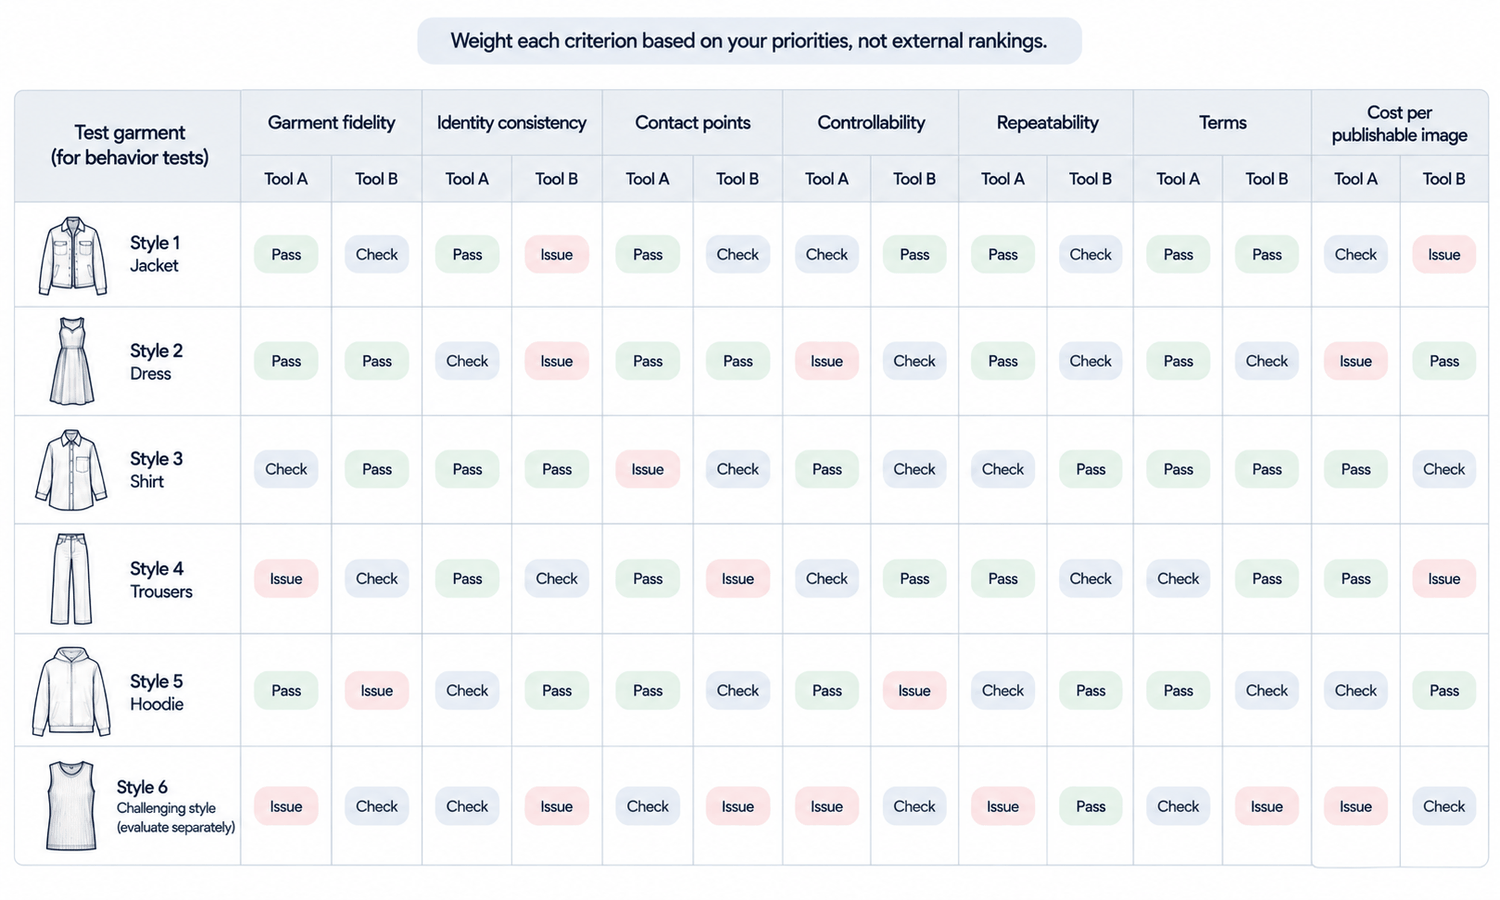
Put the results in one sheet: a row per test garment, a column per criterion, with notes on what passed and what did not. Score the images first, then the factors beyond them. Patterns usually appear quickly: one tool keeps logos intact but drifts on identity; another holds identity but softens trims.
Involve the right people in the review. The person who knows the garments in the most detail, often someone from product or quality, should check fidelity. The person who will run production day to day should judge control, repeatability and workflow. Whoever manages contracts should read the terms. A decision made by one person looking at attractive images tends to miss what the others would have caught.
Decide by your priorities. A brand selling logo-led streetwear will weigh text fidelity above almost everything; a brand with a large catalog will weigh identity consistency and repeatability. The right tool is the one that passes on the criteria that matter most for your products.
To include Lightchain AI (apparel AI) in the evaluation, run the same test with the same flat-lays and brief.
-
AI Virtual Try-On places each test garment on a model directly from its flat-lay, including on a saved model set for the identity check.
-
Model Studio sets the model, pose, scene and angle, which covers the control check one setting at a time.
-
Personal and enterprise libraries keep approved models and garment sources for the team, which covers part of the workflow check.
For brands that want on-model images built from their own garment photos, AI Virtual Try-On is the Lightchain AI solution to test. As with any tool, read its current terms against your intended use, and let your own results decide. Teams producing across many styles can extend the same workflow through Scale E-commerce.
Frequently Asked Questions
How should a brand choose an AI model tool for apparel?
Test it on your own garments rather than relying on rankings. Use a small, varied set of flat-lays and the same brief for every tool, and review the output against the garments in hand.
How many garments should a test include?
Six to ten is usually enough, covering typical styles, detail-heavy styles, different categories and one weak-area style judged separately. Every garment should be physically available for comparison.
What matters most in the output?
Garment fidelity, meaning logos, text, trims and prints that match the product, followed by identity consistency across angles and styles. Contact points, control and repeatability complete the picture.
What should be checked beyond the images?
The current terms for commercial use, uploads and ownership of outputs, how the tool fits your inputs and workflow, labeling support and the cost per accepted image measured on your garments. A tool with good images and unsuitable terms is still the wrong choice.
Why not rely on published comparisons?
They are built from other garments and often from the tools' own examples, and they age quickly as tools change. Your own test reflects your products and the tools as they are today.
How often should the evaluation be repeated?
When your range changes, when you add a channel or when a tool changes significantly. Keep the test garments and brief so results can be compared over time.
How can Lightchain AI be included in the evaluation?
Run the same test through AI Virtual Try-On, placing each test garment on a saved model from its flat-lay, and use Model Studio for the control check. AI Virtual Try-On is the solution to test for on-model images built from your own garment photos.
In Closing
No ranking can tell you which AI model tool suits your brand, because none of them uses your garments. Build a small test from your own products, give every tool the same flat-lays and brief, and review the output at full size against the garments in hand. Score garment fidelity, identity consistency, contact points, control and repeatability, then terms, workflow, labeling and cost per accepted image. Decide by the criteria that matter most for your products, and repeat the test when your range or the tools change.
Start Here
If you are choosing an AI model tool and want a decision based on your own garments, AI Virtual Try-On is the solution to include in your test. It is built around the garment source: you place each test flat-lay on a saved model, check fidelity and consistency and compare the results with every other tool on the same terms. Start with six to ten of your own styles, and let the sheet of results decide.
**Explore AI Virtual Try-On → **https://www.lightchainai.com/global/solutions/aiVirtualTryOn