
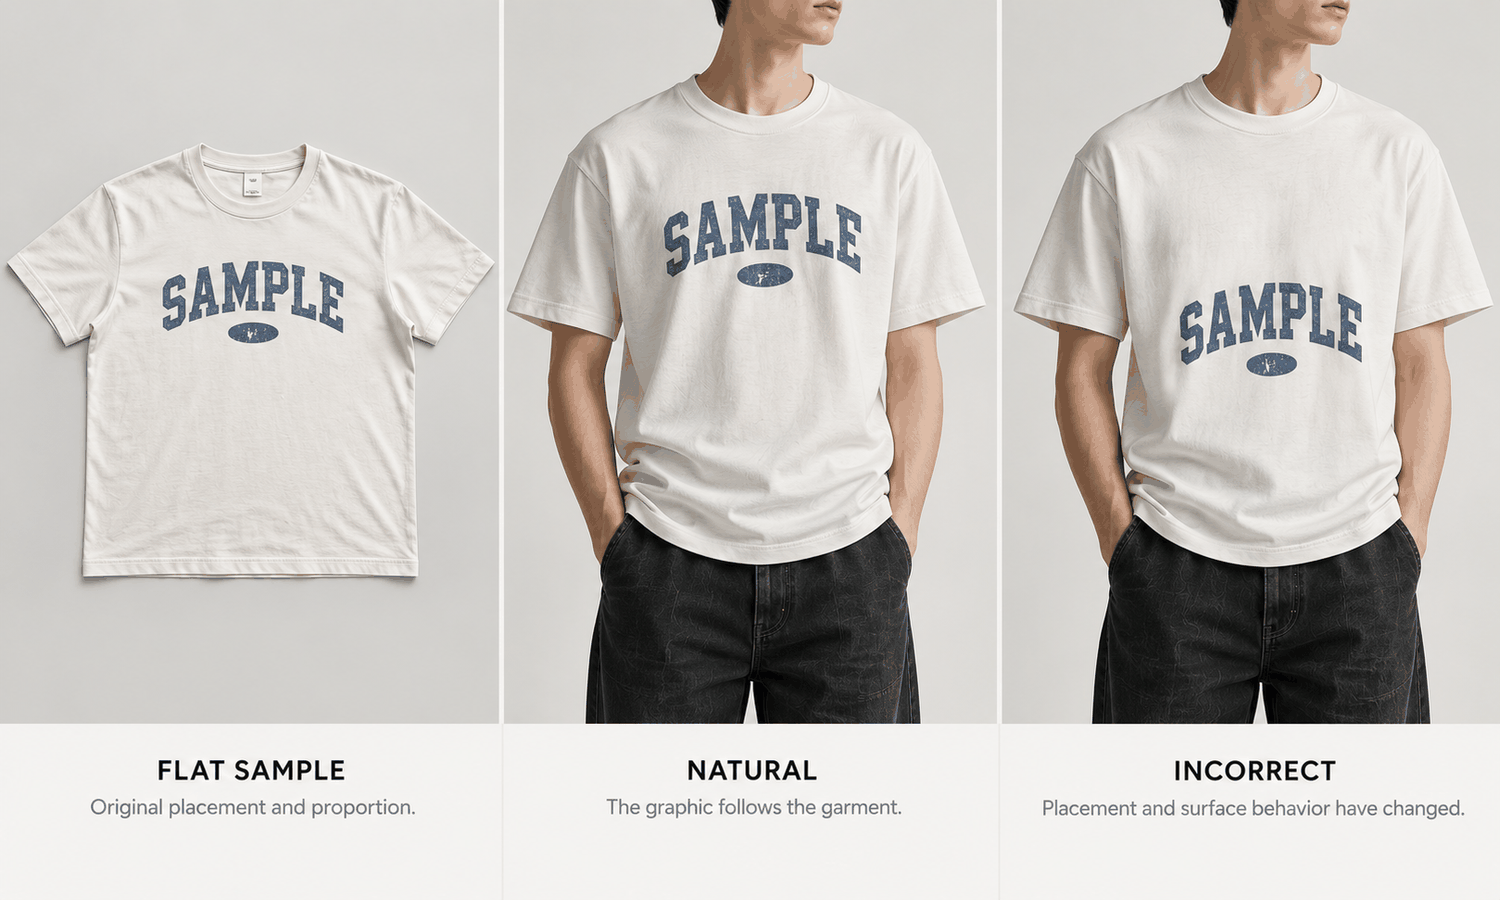
An AI T-shirt model generator can put a printed tee on a model in minutes, which is why it has become a common tool for brands and sellers with large ranges of graphic T-shirts. The garment itself is about as simple as apparel gets: a body, two sleeves, a neckline and a hem. That simplicity is exactly why the graphic matters so much. On a printed tee, the print is the product. The shopper is choosing the words, the artwork or the logo on the chest far more than the cut.
It is also the part of the image most likely to come back wrong. Printed text, logos and fine artwork are reconstructed when the shirt is placed on a model, and reconstructed graphics tend to come back almost right: a letter slightly reshaped, a line thickened, a small detail blurred. On a plain tee, small differences might pass unnoticed. On a graphic tee, they change the thing being sold.
This article explains why the graphic is where T-shirt images go wrong, what to check in text, logos and fine detail, how placement, scale and warping affect the print, how to handle colorways and designs that have not been printed yet and how to use an AI T-shirt model generator in practice.
| Graphic element | What tends to go wrong | Check against |
|---|---|---|
| Text | Letters reshaped, misspelled or merged | The artwork file, letter by letter |
| Logos and marks | Proportions shifted, details simplified | The artwork file or the printed sample |
| Fine lines and small details | Thickened, broken or blurred | Close-ups of the printed sample |
| Placement | The print sits higher or lower than it does | The printed sample, measured from the neckline |
| Scale | The print looks larger or smaller on the body | The print size on the sample |
| Warping | Distortion that does not follow the body naturally | How the printed sample looks when worn |
| Color on each shirt color | The print looks the same on every shirt color | A printed sample of each colorway |
Why the Graphic Is Where T-Shirts Go Wrong
When a T-shirt is placed on a generated model, the software reshapes the whole garment to follow the body and the pose. The fabric wraps around the torso, dips at the sides, folds slightly at the waist. The graphic has to follow all of that, and it is redrawn as it goes.
Most of a T-shirt forgives small changes. A fold that falls slightly differently, a sleeve that sits a little higher: none of it changes what the shopper receives. The graphic does not forgive. Text is either spelled correctly or it is not. A logo either has its correct proportions or it does not. A fine illustration either keeps its detail or loses it. Those are exactly the details that reconstruction tends to approximate.
The accuracy of the result starts with the flat-lay. Lay the printed tee perfectly flat, with no ripples across the print, and light it evenly so the graphic has no glare or shadow. Photograph it straight on from directly above, so the print is not skewed, and at a resolution that shows the smallest text clearly. Take a separate close-up of the graphic itself. The image can only carry through what the flat-lay shows, and a print photographed slightly out of focus or at an angle gives the generator less to work with in exactly the area that matters most.
That is why the check on a graphic tee is more exacting than on most garments. It is not enough that the image looks right at a glance. The graphic in the image has to match the artwork that will be printed, closely enough that a customer holding the shirt would recognize it as the same.
Text, Logos and Fine Detail
Start with the elements that must be exact.
-
Text. Read every word against the artwork, letter by letter. Look for reshaped letters, doubled or missing letters, letters merging into each other and small text that has turned into an illegible texture.
-
Logos and marks. Compare proportions, spacing and details with the artwork. A mark that is slightly wider, has a simplified element or has lost a small feature reads as a different mark.
-
Fine lines and small details. Thin lines, small type, halftone dots and intricate illustrations are the most likely to thicken, break or blur. Check them at full size.
-
Edges and colors within the print. Crisp edges should stay crisp, and each color in the print should keep its boundary without bleeding into its neighbors.
View every image at full size for this check, not as a thumbnail. Many graphic errors are invisible at small sizes and obvious at full resolution, and a shopper zooming in on a product page will see what a reviewer glancing at thumbnails missed. Check every image, without exception: images produced from the same source and settings tend to share the same mistake.
Placement, Scale and Warping
Even when the graphic itself is correct, where it sits and how it bends can misrepresent it.
Placement is the first thing to compare. A chest print that sits a few centimeters lower in the image than on the real shirt changes how the tee looks. Measure the printed sample from the neckline to the top of the print, and check that the image agrees.
Scale is the second. The same print can look larger or smaller depending on how the body and the shirt are rendered. Compare the print's width with the shirt's width across the chest in the sample and in the image; the proportion should match.
Warping is the third. A print on a worn T-shirt does bend with the body: it curves slightly over the chest, narrows a little toward the sides and can break across a fold. That natural distortion is expected. What misleads is distortion that does not follow the body, such as a print that stays perfectly flat on a curved chest, or one that stretches in a way a printed shirt would not.
Pose makes a large difference. A front-facing, relaxed pose with the arms away from the body keeps the print flat and fully visible, which suits the primary product image. Turned torsos, crossed arms and hands near the chest hide or bend the graphic and are better kept for secondary or campaign images.
Colorways and Designs Not Yet Printed
Graphic tees usually come in several shirt colors, and each one needs its own images.
The same print can look different on different shirt colors. How inks sit on light and dark fabrics varies with the print method, so a graphic on a white tee and the same graphic on a black tee may not share the same colors or contrast. Recoloring one image to create the others shows what a colorway might look like, not what it does look like. Photograph a printed sample of each colorway as a flat-lay and place each on the model separately.
Color needs its usual care. Screen color is not a physical reference, generated imagery does not promise an exact color-code match and the shirt color and print colors are judged against the physical sample.
Designs that have not been printed yet need clear labeling. Sellers who print on demand often need images before a design has been printed, and a generated image of an unprinted design shows a mockup, not a product. Label it as such where the channel allows, and check the first printed shirt against it as soon as it exists. If the printed result differs, replace the image with one made from the printed shirt.
Using an AI T-Shirt Model Generator in Practice
The workflow for graphic tees is short: print a sample, capture it, place it on the model and check the graphic.
In Lightchain AI (apparel AI), that workflow uses a few tools.
-
AI Virtual Try-On places the printed tee on a model directly from its flat-lay, including on a saved model set, so each colorway appears on the same person.
-
Model Studio sets a front-facing, relaxed pose and a consistent scene for the primary product images.
-
When a small part of a graphic comes out wrong in an otherwise good image, Target Revision can correct a defined area using a reference image, as described on the Partial Redraw page, and the result is checked against the artwork again.
For sellers with large ranges of graphic tees, AI Virtual Try-On is the Lightchain AI solution built around starting from the garment. Where a graphic cannot be reproduced faithfully, a photograph of the printed sample on a plain background is the reliable fallback.
Frequently Asked Questions
What should be checked in images from an AI T-shirt model generator?
Above all, the graphic: every letter of the text, the proportions of logos, fine lines and small details, the print's placement and scale and how it bends with the body. Check every image at full size against the artwork and the printed sample.
Why do graphics come out slightly wrong?
Because the graphic is redrawn as the shirt is placed on the body, and reconstructed text and artwork tend to come back almost right. On a graphic tee, almost right changes the product.
Which pose suits graphic tees?
A front-facing, relaxed pose with the arms away from the body, which keeps the print flat and fully visible. Save turned torsos and crossed arms for secondary or campaign images.
Can one colorway's image be recolored for the others?
No. The same print can look different on light and dark shirts depending on the print method. Photograph a printed sample of each colorway and place each on the model separately.
How should designs that have not been printed be shown?
As mockups, labeled where the channel allows. Check the first printed shirt against the image and replace the image if the printed result differs.
What if a graphic cannot be reproduced faithfully?
Use a photograph of the printed sample on a plain background for that design. A clear photograph is better than an attractive image with the wrong graphic.
Which Lightchain AI solution suits graphic T-shirts?
AI Virtual Try-On is the one to use. It places each printed tee on a saved model from its flat-lay, and small graphic corrections can be made in a defined area from a reference image. Every graphic is still checked against the artwork.
In Closing
An AI T-shirt model generator handles the simple part of a T-shirt easily, and the graphic is where the care goes. Check text letter by letter, logos and fine detail at full size, and placement, scale and warping against the printed sample. Pose the model so the print stays flat and visible, photograph each colorway rather than recoloring one, label mockups of unprinted designs and fall back to a photograph when a graphic cannot be reproduced faithfully.
Start Here
If you sell graphic tees and want on-model images that show every print exactly as it will arrive, AI Virtual Try-On is the solution to use. It is built around starting from the garment: you photograph each printed sample as a flat-lay, place it on your saved model and correct small graphic details from a reference. Start with a few designs across two shirt colors, check every letter against the artwork, and extend from there.
**Explore AI Virtual Try-On → **https://www.lightchainai.com/global/solutions/aiVirtualTryOn